Another year is coming to an end. So it's time to take a look at what I had set
out as my goals for this year, what was I able to accomplish, what didn't happen
and what else came along. First is a list of my original goals and what happened
with each one.
Feb: Tammy's Secret Garden – this is a 50th birthday present
for a dear friend of mine that I have known for many
years – completed
Feb: Signed up for the "In Full Bloom" workshop with
Elaine Quehl which is a flower wall hanging and I will be doing a
poppy – poppy completed, still need to finish background and then the quilting
Feb: Also signed up for a second workshop called
"Surface Design Techniques" with Elaine Quehl – completed (note: this was just a workshop exploring techniques with no actual project to complete)
Mar: Finish
Falling Splendor quilt – never started
Spring: Create a Kaleidoscope quilt
based on Ricky Tims techniques from his quilt seminar that I attended last
fall – cancelled this project
Spring - Summer: Create a landscape quilt based on the
Picture Piecing techniques of Cynthia England – never started
Jul: Another
birthday quilt present for a friend – completed
Aug: Create a small
quilt for the silent auction for the York Heritage Quilt Guild 2011 Show in
Nov – started but never completed
Sep - Oct: Create a quilt to enter into the York
Heritage Quilt Guild 2011 Show in Nov: this became the Wild Mustang quilt – completed
Christmas charity
quilt: Using blocks from the Friday Block Party 2009 – never started
Any
time:
One block wonder quilt ( I already have the fabric and am
curious as to how this will turn out) – never started
Start my own unique design of a
Rhapsody quilt based on Ricky Tims techniques – the plan here is to have a
completed design ready to start a quilt the following year, this in my books is
a major project – never started
UFOs that are outstanding: – all are still
outstanding but I have the 2 wall hangings from Gloria's workshop sandwiched and ready for quilting
Hawaiian orchid pillow – hand quilting
2 wall
hangings from Gloria Loughman’s workshop – colour is magic and layer by
layer
Kaffe Fassett – colour in design diamond quilt
BOM: Drunkard’s Path
Variations
Tranquil Moments quilt – quilting left to do
So from this list I completed 3 projects, 4 are partially finished, 1 I decided
not to go forward with, and the rest will be moved to next year to be done or become UFOs but hopefully sometime in the future will get done.
In
addition the following new projects happened in 2011:
Nov: Quilted 2 oriental wall hangings for a friend – completed
Dec:
Quilted an additional 2 oriental wall hangings for a friend – completed
So in addition to the 3 completed projects from the original list I did another
4 partial projects (quilting only) in 2011. I have to admit that this hasn't been as successful a year for my quilting as previous years but I have had some medical issues that I have been dealing with. One of which has been severe iron deficiency anemia which left me very fatigued and at times I barely had enough energy to get through the basics of a given day. I have had this condition for almost 3 years, have been through the gamut of tests and basically no one was able to find a definitive cause for it. I was finally switched from iron supplements which actually stopped working this spring and spent 3 months going for weekly iron infusion treatments at the local hospital. I have to say that my system has responded well to the treatments and it looks like at this time I just need to go about every 3 months for a top up treatment to keep my levels in the normal range.
So next I'm
going to review what my goals are going to be for 2012 and then will post them
hopefully on New Year's Day.
I wish everyone a very happy, healthy and
prosperous New Year,
Vicki
Saturday, December 31, 2011
Monday, December 19, 2011
UFOs
Well there's not much time till the end of the year and I knew that if I started a new project that there was no chance of it getting done before 2012. So I looked through my list of UFOs from my post at the beginning of the year titled "2011 New Years Goals". There I also listed what UFOs I had at the beginning of the year. I noticed that I had 2 wall hangings from a class that I took from Gloria Loughman back in Dec 2008. I think it is about time I got these finished.
I got the one sewn together since it was still in pieces, and then the borders attached to both of the wall hangings.


I now have to cut fabric for the backings, cut batting and make the quilt sandwiches. That should get done in the next day or so. I likely won't get the quilting done until sometime between Christmas and New Years eve, but the plan is to get these two finished before New Year's Day.
Monday, December 12, 2011
Helping Out A Friend - Kimono Wall Hangings part 2
Well it's been awhile since I have posted. It's been that time of year getting things ready for the holidays along with the usual colds that happen and slow things down at times. The only quilting that I have done was to finish the remaining 2 kimono wall hangings for my friend. Here are pictures of the last 2.


We had our Christmas dinner and get together with friends yesterday and had a lovely time. The friend who I was helping out on these kimono wall hangings was finally able to give her gifts to our friends and they loved them. I did get credit for the quilting and they loved the details that I included like the koi fish and the Japanese maples.
So what else have I been doing, Christmas baking. So what did I make I make this year? A cherry streusel bar.

Ginger spice cookies and chocolate orange macaroons.

Maple pecan squares.

Nanaimo bars.

So what is your favorite Christmas treat?
Wednesday, November 9, 2011
Wild Mustang - Part 12 Final Touches
I ended up doing one more thing to the Wild Mustang quilt. Several weeks ago I came across a web site called Sedona Flame where they sell both jewellery and beads in the southwest style.
http://www.sedonaflame.com/fetish.htm The beads looked great and I thought they would add another dimension to the Wild Mustang quilt. The perfect place for them was in the small brown inner border and I wanted to stick with stones in the brown tones. I initially looked at the horses but there wasn't enough quantity in the various brown toned stones. I checked the Zuni bears and there I was able to get the quantity that I needed and the price was actually better than what it would have cost me for the horses. I ended up getting 10 each of the tiger eye, oyster opal agate, picture jasper and leopardskin jasper beads. I was hoping to get the silverleaf but it wasn't available.
The stones arrived last week and they were perfect in terms of colour, size and shape. I just finished sewing the last of the beads onto the quilt today and it is ready to be delivered tomorrow to the guild to get ready for the show which starts on Friday. Here's the overall picture of the quilt with the beads on it. Basically the beads just circle around the quilt going from left to right, following the same direction as the quilted horses heads in the border.

Here is a close up of the beads.

So for those of you who live in the Toronto area or are visiting this weekend don't forget to come out and see the show. For details you can check the show's web site at:
http://www.yhqg.org/Celebration/quiltshow2011/celebrationXI.html
Tuesday, November 1, 2011
Bloggers Quilt Festival - Fall 2011
Amy's Creative Side is sponsoring the Fall 2011 Bloggers Quilt Festival. You can check out some wonderful quilts, enter your quilt in the show as well as sign up for some wonderful giveaways at: http://amyscreativeside.com/2011/10/28/bloggers-quilt-festival-fall-2011/?utm_source=feedburner&utm_medium=feed&utm_campaign=Feed%3A+amyscreativeside+%28Amy%27s+Creative+Side%29
A special quilt that I made was back in 2009 and it was called Dragon Odyssey.

I made it for a close friend of mine. She had asked for a quilt with dragons but most of the fabric with dragons on it was geared more to kids. I eventually saw a wall hanging that used a batik dragon panel and I thought that this was a much better idea. I was able to source a batik dragon and made this quilt for my friend's birthday. Her favourite colours are purple and turquoise so those were the main colours that I used for this quilt. She loved the quilt and to this day it hangs in her living room.
Monday, October 31, 2011
Helping Out A Friend - Kimono Wall Hangings
A friend of mine was making these Kimono Wall Hangings a few years ago and only got them finished to a certain point. They were pieced, the sandwiches made and stitch in the ditching was done. She developed arthritis in her thumbs and now has a hard time hanging onto the quilts to be able to guide them to do free motion quilting or to follow any kind of quilting pattern. So I volunteered to help her get the quilting done.
There are 4 wall hangings in total, 2 of each style. Here is the first one that is completed.

In the border I went with a stylized chrysanthemum pattern. This pattern I'm using in all four wall hangings.

Then in the sleeves of this style of wall hanging I quilted koi fish.

I also did koi fish in the cream coloured areas of the wall hanging.

Here is the second one that is completed.

On the sleeves and at the bottom of the kimono there are small fabric origami kimonos that were hand appliqued to the wall hanging. My friend picked them up at one of the yearend sales that were held at our quilt guild.

Then in the cream coloured areas of this style of wall hanging I quilted Japanese maple leaves.

So I now have 2 left to do, one each of the above styles. This has been a fun project, it gave me some more practice on my quilting skills and fortunately they were a manageable size.
There are 4 wall hangings in total, 2 of each style. Here is the first one that is completed.

In the border I went with a stylized chrysanthemum pattern. This pattern I'm using in all four wall hangings.

Then in the sleeves of this style of wall hanging I quilted koi fish.

I also did koi fish in the cream coloured areas of the wall hanging.

Here is the second one that is completed.

On the sleeves and at the bottom of the kimono there are small fabric origami kimonos that were hand appliqued to the wall hanging. My friend picked them up at one of the yearend sales that were held at our quilt guild.
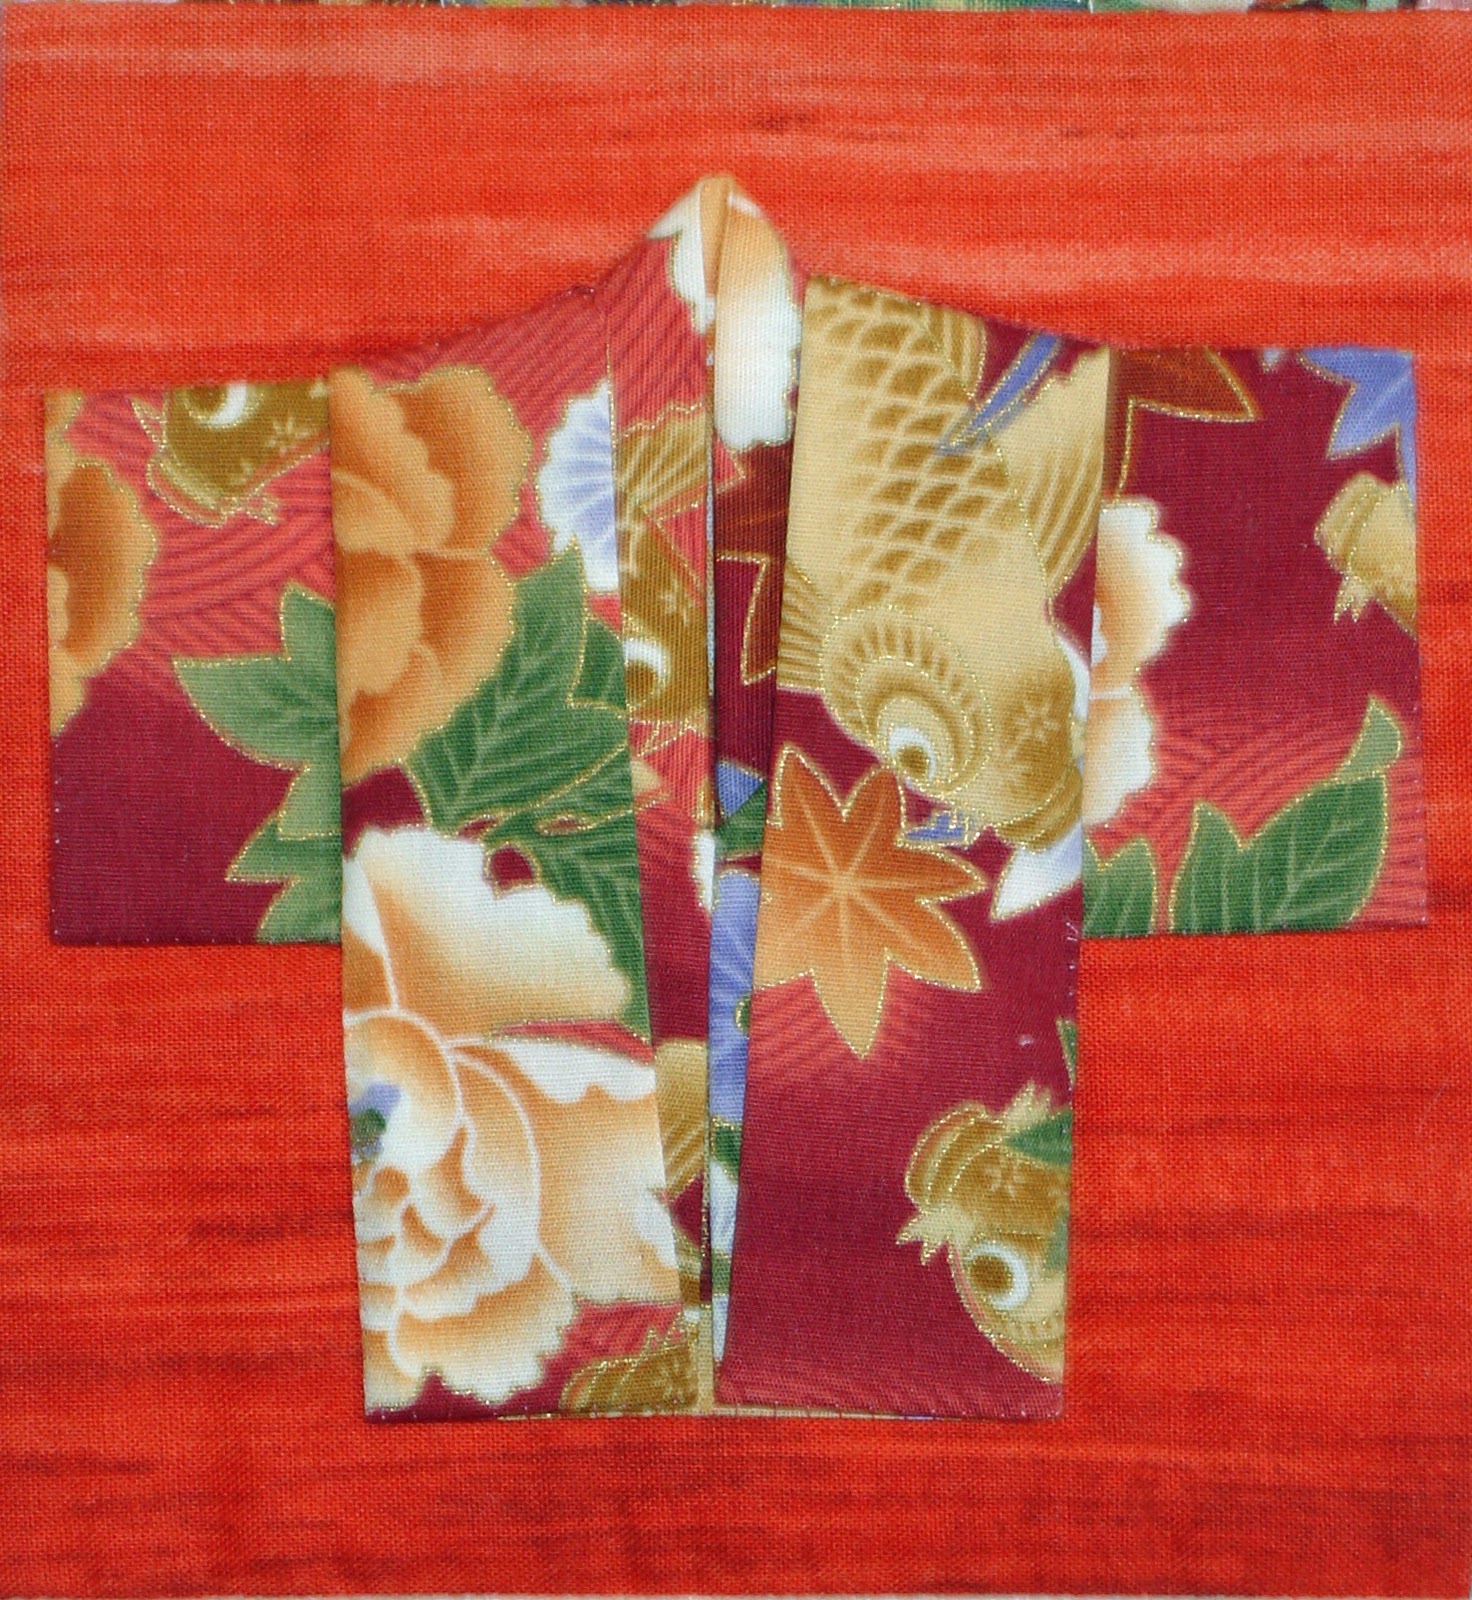
Then in the cream coloured areas of this style of wall hanging I quilted Japanese maple leaves.

So I now have 2 left to do, one each of the above styles. This has been a fun project, it gave me some more practice on my quilting skills and fortunately they were a manageable size.
Sunday, October 23, 2011
Wild Mustang - Part 11
The Wild Mustang is finished. I got the binding on a few days ago and the label is on but the last couple of days we had a lot of dark and stormy weather which made it difficult to take any decent pictures. Today the sun finally came out and I got my picture of the finished wall hanging. Here it is.

Here is a picture of the back. The light Stongehenge fabric at the top is the hanging sleeve, I unfortunately didn't have enough of the darker fabrics left for a sleeve.

For anyone in the Toronto area or will be in the city on November 11 - 13 and would like to see the Wild Mustang along with lots of other great quilts, it is going to be at the York Heritage Quilters Guild Show. You can get details at the show's web site at: http://www.yhqg.org/Celebration/quiltshow2011/celebrationXI.html
So what's next you may wonder. I figure it's time to go back and work on the poppy wall hanging that I started in the spring time.
Friday, October 14, 2011
Wild Mustang - Part 10
I finished the border quilting on the Wild Mustang quilt yesterday. I was quilting a horse head motif with a flowing mane. Here is what it looks like. If you click on the picture you should be able to see it a bit better.

The horse heads just circled around the whole quilt.
Today I got the binding attached and now I just need to get the hand sewing done and get the label attached. So it's almost done.

The horse heads just circled around the whole quilt.
Today I got the binding attached and now I just need to get the hand sewing done and get the label attached. So it's almost done.
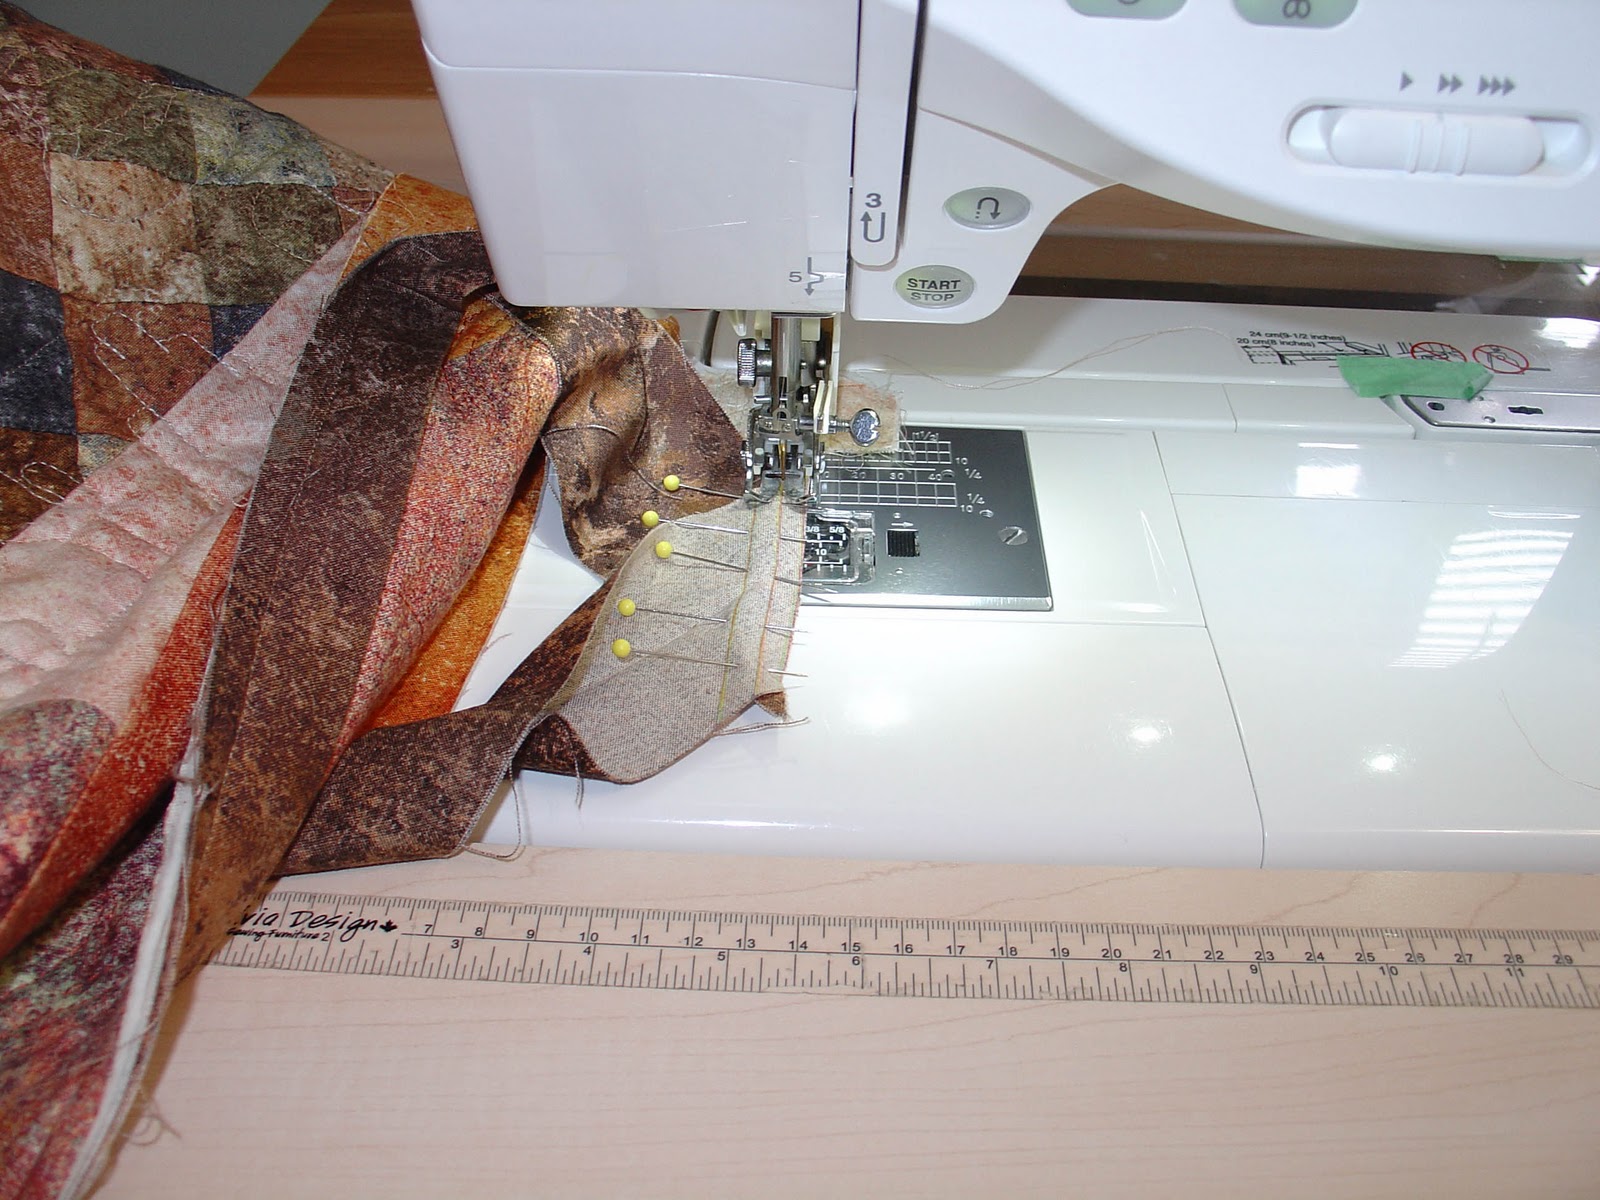
Tips & Tricks - Joining The Ends of The Binding
I have been asked by a couple of my quilting friends how do I join the ends of my binding. I have to admit that it did take me awhile to learn and in the end I actually had to figure it out on my own. I looked it up on the web and most of what I saw didn't quilt make sense to me. A friend recommended a book Called Rotary Magic by Nancy Johnson-Srebro which really is a good overall reference book, and it helped me almost get there. But I still managed to mess it up by either getting the two ends twisted, or sewing it inside out, or I ended up with too much binding or not enough. I had a friend help me, I watched her a couple of times and still no luck. So one day I sat down with the Rotary Magic book and tried to figure out where I was getting stumped and tried to come up with a way that would work for me. After several attempts I was successful and ever since my bindings come out every time, never twisted and always the right size. So here is my step by step instructions for how I join the ends of the binding.
First make sure you leave a good 15 inches of binding before you start sewing it on and when you come to the end leave 15 inches of working space between where you start and end the inital sewing of your binding. I found that this really makes a big difference instead of the usually 8 - 12 inches.

Next take the right hand strip and unfold it so it lays flat against your cutting board.

Place you 6" square ruler on point and the middle line is lined up against the left hand side of the strip and the first inch of the ruler is above the bottom of the quilt.

Take your rotary cutter and cut along the diagonal at the bottom of the ruler.

Your right hand strip should look like this.

Take the left hand strip and place it along the edge of the quilt. Carefully flip open just the top layer and take a pin and pin down the bottom portion where the binding is attached to the quilt (left hand side) and again at the opposite end (right hand side). (click on picture for better details)

Now carefully fold over the left hand side and pin it about 2 inches from the first pin.

Bring the left hand strip of binding and lay it on top of the opened up binding.

Lay your 6 inch ruler over the edge of the left hand strip. Draw a line across the entire back of the right hand piece to mark where the left hand piece ends.

Draw two more lines 1/4" apart from the original line that you drew going towards the unattached end of the right hand binding piece. (click on picture for better details)

Cut off excess binding.

Lay the 2 binding strips back on top of the quilt in their normal positions.

Bring the right sides together of the right and left hand binding strips and flip so that you now have the wrong side facing you. If you scrunch your quilt here it will be easier.

Place a pin in the middle and at either end. At the ends you will notice that you will have points extending beyond the regular line of the binding. This is the way is should look. See areas in green circles. (click on picture for better details)

Add a couple of extra pins to ensure nothing shifts.

Now you sew down the middle line of the three that were drawn.

Take the pins out and finger press the seam open.

Fold the binding back into position and check to see that it is the appropriate length. At this point you can trim the points.

Now finish sewing the rest of the binding. As you can see from my binding it was the right size for this quilt.

I hope that is has been of help and if you have any questions please feel free to ask and I will try to help you out.
First make sure you leave a good 15 inches of binding before you start sewing it on and when you come to the end leave 15 inches of working space between where you start and end the inital sewing of your binding. I found that this really makes a big difference instead of the usually 8 - 12 inches.

Next take the right hand strip and unfold it so it lays flat against your cutting board.

Place you 6" square ruler on point and the middle line is lined up against the left hand side of the strip and the first inch of the ruler is above the bottom of the quilt.

Take your rotary cutter and cut along the diagonal at the bottom of the ruler.

Your right hand strip should look like this.

Take the left hand strip and place it along the edge of the quilt. Carefully flip open just the top layer and take a pin and pin down the bottom portion where the binding is attached to the quilt (left hand side) and again at the opposite end (right hand side). (click on picture for better details)

Now carefully fold over the left hand side and pin it about 2 inches from the first pin.

Bring the left hand strip of binding and lay it on top of the opened up binding.

Lay your 6 inch ruler over the edge of the left hand strip. Draw a line across the entire back of the right hand piece to mark where the left hand piece ends.

Draw two more lines 1/4" apart from the original line that you drew going towards the unattached end of the right hand binding piece. (click on picture for better details)

Cut off excess binding.

Lay the 2 binding strips back on top of the quilt in their normal positions.

Bring the right sides together of the right and left hand binding strips and flip so that you now have the wrong side facing you. If you scrunch your quilt here it will be easier.

Place a pin in the middle and at either end. At the ends you will notice that you will have points extending beyond the regular line of the binding. This is the way is should look. See areas in green circles. (click on picture for better details)

Add a couple of extra pins to ensure nothing shifts.

Now you sew down the middle line of the three that were drawn.
Take the pins out and finger press the seam open.

Fold the binding back into position and check to see that it is the appropriate length. At this point you can trim the points.

Now finish sewing the rest of the binding. As you can see from my binding it was the right size for this quilt.

I hope that is has been of help and if you have any questions please feel free to ask and I will try to help you out.
Tuesday, October 11, 2011
Wild Mustang - Part 9
I finally finished the quilting on the background portion of the Wild Mustang quilt. Yes it has taken some time for a wall hanging but then it took some time to finally make a decision as to what I was going to quilt in this area. Initially I was planning on an all over pattern but as I was testing out various options on paper I started to think that they were all going to be too busy for what I was envisioning for this wall hanging and would likely compete with the main focus the horse.
So I left it for a few days when my friend and quilt buddy Sue from Long Island suggested why don't I just keep it simple and do stitch in the ditch. Well that would be easy and it wouldn't complete with the horse so I started my stitch in the ditch work. While I was working on the quilt I realized that these fabrics really reminded me of Arizona, the desert and red rock country.

With that it came to me what I needed to quilt on the background. In the top and bottom row of the background I did a desert scene with cacti and rock formations. If you click on the picture you will be able to see the details better.

Then scattered throughout the rest of the background I did an assortment of petroglyphs and native symbols such as the sun, bear, kokopelli, turtle, medicine man, pots, horse, thunderbird, feathers, etc. Here are a few samples that I was able to photograph where the images came out. I quilted these with a variegated thread called natural stone so it really does blend into the background fabric and doesn't complete with the horse.


So now I'm started to work on the border quilting which will be a series of horses heads with flowing manes going around the quilt.
The fall leaves are just starting to turn here and they are looking really beautiful. This is a really beautiful time of year and this past week we have had amazing weather. I wish it could stay like this for several more months. Here is a picture of the trees from my balcony.

Friday, September 23, 2011
Wild Mustang - Part 8
I've been working on the quilting of the horse section and that is now complete. First I just quilted around the various sections of the reverse applique so on the front those quilting lines actually blend in with the applique stitches but when you actually look at the quilt those areas start to take on that puffy look of quilting. Then I did 3 rows of echo quilting around the image of the horse and that is now completed. Here is what it looks like at this stage.

One thing I have to say is that I have really enjoyed working with the hand basted quilt sandwich. Using Sharon Schamber's technique of the herringbone basting stitch has kept all the layers together and nothing has been shifting which is really a nice treat.
So now that this portion of the quilting is done I now know how much background space I have left and will be planning out the background quilting this weekend. Also I want to share this picture of Fergie who decided to take a nap on the quilt while I stepped away for a break.

Subscribe to:
Posts (Atom)