Wednesday, August 29, 2012

Alpaca Wall Hanging - Part 1

Here is my latest project an Alpaca wall hanging. The image of the 2 Alpacas was kindly donated by a friend.  The original image actually had these 2 Alpacas in front of a herd of other Alpacas.  My friend Sue from Long Island was kind enough to ask her daughter who knows Photoshop inside and out to do some editing to take the 2 Alpacas out from the herd and then place them against a more neutral background.  I then sent out the image to Spoonflower to get it printed to Kona cotton fabric.  I used Kaufman's mist fusion in onyx for the narrow border and a gray Stonehenge for the large border.


Now I'm going to do a bunch of thread painting in the main image to define the Alpaca's features and add some texture to their fur.  I then plan to add some variation of colour to the grass so it doesn't look so much like a golf green. Also I will add some definition to some of the trees in the background.

For the border I'm still testing out some ideas for a pattern that will first be quilted.  Then I plan to bring out that quilting with some couching using some Alpaca yarn that I got a few weeks ago. Here is the yarn that I got.


I don't have a lot of time for this project since my deadline to get this one finished is next week Tuesday. I'm not sure if I will make it but this isn't a big wall hanging measuring at 28" by 32". I'll keep you posted.

Thursday, August 23, 2012

Gerber Daisy Wall Hanging - Part 5

The Gerber Daisy wall hanging got finished this past weekend and then I was off visiting friends out of town including Karen who had her birthday yesterday and this quilt was for her. She totally loved it and Gerber daisies are her favorite flower. Here is a picture of the finished quilt.


I didn't have enough of the forest mist fusion fabric so the binding was done in the onyx mist fusion.  It turned out great in that the onyx colour acted like a frame for the quilt. For the quilting I did some Gerber leaves in the lower area around the Gerbers as well as some stylized ferns. At the top of the quilt I did Wisteria and a hummingbird. The borders were quilting with silhouettes of hummingbirds going around the quilt. Here are the details of the quilting. First the Gerber leaves.


This is the fern.


Here is the wisteria.


This is the hummingbird, it is a amethyst throated hummingbird.


This is the quilting in the borders.


I really enjoyed making this quilt wall hanging for Karen.  It's size is 36" wide by 38" tall. The interesting thing is not only does she have Gerbers growing in her garden but she also has ferns and wisteria in her garden and hummingbirds do come to visit her garden.

Monday, August 13, 2012

Gerber Daisy Wall Hanging - Part 4

All 5 Gerbers have been appliqued and the details of the petals have been stitched in. This is what the wall hanging looks like at this point.


It may be a bit difficult to see some of the details on the flowers so I have some close up shots. Here is the first Gerber. On this Gerber I used printed batiks.


Here is the second one and on this one I used hand dyed and printed batiks.


On the third one I used Fossil Fern fabrics.


The forth one has hand dyed batiks, a mist fusion and a Fossil Fern.


On the last Gerber I used a mist fusion, a couple of fairy frosts, a printed batik and a hand dyed.


On the Gebers there are anywhere from 3 to 5 thread changes (excluding the dark brown center). I'm using Madeira's Polyneon polyester thread.  The thread is made in Germany, was developed for machine embroidery so it's very durable and the colour selection is amazing. The other nice thing is the price is great, especially if you are on a budget. I do love my Superior Threads, they are expensive and they are worth it, but it's hard to build a stash of thread when one is on a budget.  My friend Sue introduced me to Madeira thread and she was introduced to it by a quilting teacher when she took a thread painting class. I got my thread spools from a company called All Stitch for $2.63 for 1,100 yards. They also ship to Canada which is great. Here is the thread that I'm taking about: 
http://www.allstitch.net/department/sort-polyester-40-spools-color-card-order-10192.cfm
If you are looking into buying an assortment of threads I would suggest getting the colour chart first since they are made from the actual threads and you can see what the actual colours look like which are very different from what appears on your monitor.

Well time to start making the quilt sandwich.


Saturday, August 11, 2012

Gerber Daisy Wall Hanging - Part 3

I've been busy all week working on this wall hanging. I finished putting the borders on the diamond background and this is what it looks like now.


I also got all the Gerber daisies drawn out onto fabric and cut out. The back of my fabrics are fused with Misty Fuse. I've got them all arranged now onto the background and this is the layout that I'm going with.


I now have to mark the center position of each Gerber and then will remove each one. Next I will start with the darkest one at the top and start the ironing process to fuse it to the background.  Once I have that flower in place I will work on stitching in the details of the petals for that flower. Once I've completed that one, then onto the medium red / fuchsia Gerber and repeat the process. Then it will be the peach one, followed by the bright pink one and last will be the pale pink with the mauve centre.

Then I will be ready to put together the quilt sandwich. I will outline the Gerbers as part of the quilting. Then I plan on doing some Gerber leaves, and I'm thinking of adding some Ostrich ferns over on the left hand side. I'm still not quite sure what will get quilted in the upper green area but my mind is thinking of possibly adding a humming bird to the mix. As the quilting evolves I'm sure this piece will speak to me and I will know what needs to go in the upper green area.

Well time to go back and carefully remove all my Gerbers from the background piece and start fusing the dark Gerber. Have a great weekend everyone.

Friday, August 3, 2012

Gerber Daisy Wall Hanging - Part 2

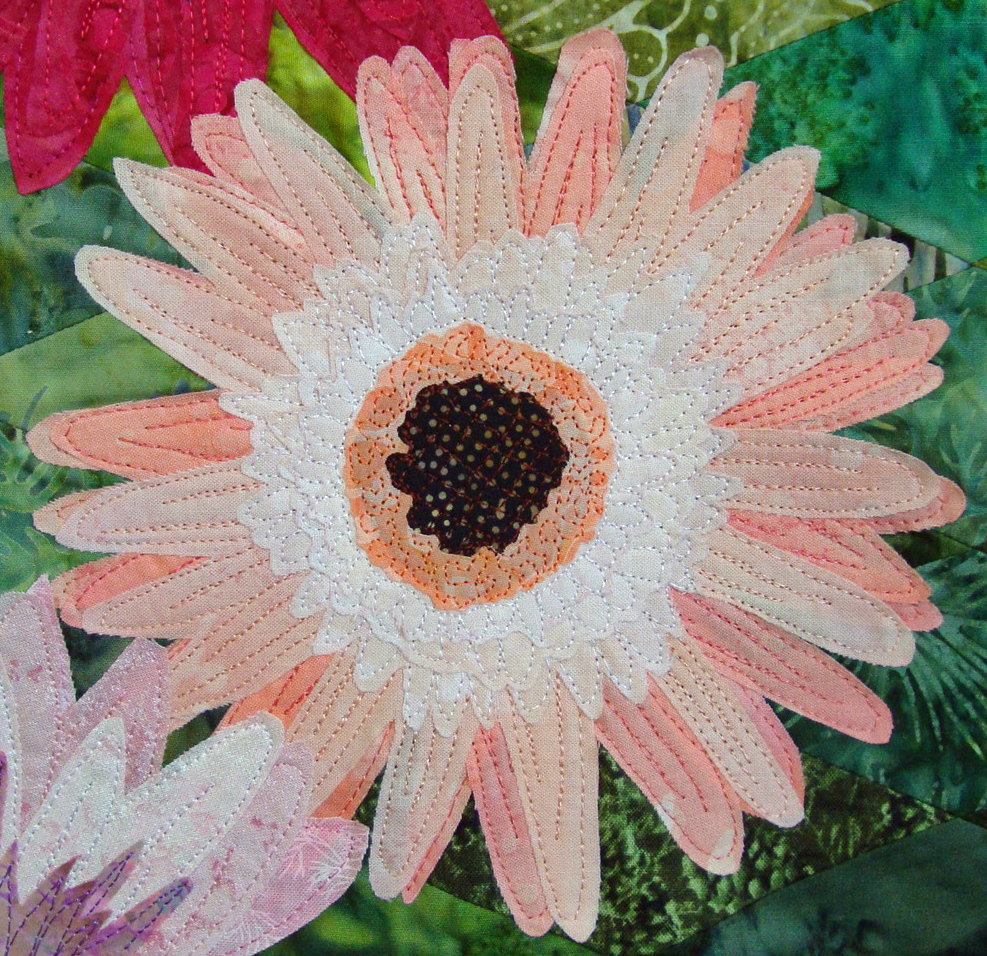
I finished sewing all the diamonds together for the background layer of the Gerber daisy wall hanging. I'm very pleased with how it turned out and this is what it looks like.


I now just have to add the narrow pink border and the wider mid to dark green border.  I'm going to wait until I have my pink Gerbers cut out and placed against the background so that I can then audition the border fabrics to make sure I pick the ones that will best compliment both the background and the flowers.

Now working with these diamonds and the bias edges does have its challenges, the biggest ones being that you don't distort or stretch the diamonds while sewing &/or pressing them.  When I first ironed all my fabric I did use some spray starch.  I found this helped with the cutting of the diamonds as well as in the sewing of the diamonds. When it came to ironing the rows of joined diamonds Jan Krentz recommended to make an ironing template to keep the strips straight when you press them.  All you needed was a plain piece of cotton fabric and then just draw on it parallel lines the width of your rows of diamonds.  Then you just pin it to your ironing board.  This is what my cloth looks like.


Then you lay one of the rows of diamonds so that it is aligned between the lines that you have drawn. As you iron make sure that you keep the row in place.  I found using this cloth kept my row nice and straight and nothing got distorted.  I also used a dry iron since in the past I have found that using steam can distort blocks with bias seams. Here is what one of my rows looks like on the pressing template.


The next challenge is joining the rows and getting the intersections to align. Jan had several methods outlined in her book.  I tried a few, some sort of worked, but not consistently enough for me.  I think it is something that does take practice. I did though find one method that seemed to work for me. It was the one where you actually take each row separately and without any thread in the sewing machine, go and stitch just at the seam area a 1/4" line to mark your fabric.  Here is a picture of a row at the machine being stitched.


This is what it will look like after you take it out.  Please note that the holes the needle leaves works well in tight weave fabrics like batiks, but if you have loose weaves then this method might not work so well.


Now that you have your fabric marked, take a pin and stick it at the stitched line into the seam of the two fabrics.


Do the same to the second layer of fabric.


Finish pinning the two sections together.


Continue doing this for all the intersecting seams and then sew your 1/4" seam. This is the end result that I got with this method.  I did have a few intersections that I had to rip out and redo, but for the most part I got really good matches.


So this weekend I'm going to be busy with making my Gerber daisy patterns for the 5 flowers and then getting all the pink fabrics prepped and cut. That should keep me busy.