Showing posts with label Tips and Tricks. Show all posts

Friday, October 14, 2011

Tips & Tricks - Joining The Ends of The Binding

I have been asked by a couple of my quilting friends how do I join the ends of my binding.  I have to admit that it did take me awhile to learn and in the end I actually had to figure it out on my own.  I looked it up on the web and most of what I saw didn't quilt make sense to me. A friend recommended a book Called Rotary Magic by Nancy Johnson-Srebro which really is a good overall reference book, and it helped me almost get there. But I still managed to mess it up by either getting the two ends twisted, or sewing it inside out, or I ended up with too much binding or not enough.  I had a friend help me, I watched her a couple of times and still no luck. So one day I sat down with the Rotary Magic book and tried to figure out where I was getting stumped and tried to come up with a way that would work for me.  After several attempts I was successful and ever since my bindings come out every time, never twisted and always the right size.  So here is my step by step instructions for how I join the ends of the binding.

First make sure you leave a good 15 inches of binding before you start sewing it on and when you come to the end leave 15 inches of working space between where you start and end the inital sewing of your binding. I found that this really makes a big difference instead of the usually 8 - 12 inches.


Next take the right hand strip and unfold it so it lays flat against your cutting board.


Place you 6" square ruler on point and the middle line is lined up against the left hand side of the strip and the first inch of the ruler is above the bottom of the quilt.


Take your rotary cutter and cut along the diagonal at the bottom of the ruler.


Your right hand strip should look like this.


Take the left hand strip and place it along the edge of the quilt. Carefully flip open just the top layer and take a pin and pin down the bottom portion where the binding is attached to the quilt (left hand side) and again at the opposite end (right hand side).  (click on picture for better details)


Now carefully fold over the left hand side and pin it about 2 inches from the first pin.


Bring the left hand strip of binding and lay it on top of the opened up binding.


Lay your 6 inch ruler over the edge of the left hand strip.  Draw a line across the entire back of the right hand piece to mark where the left hand piece ends.


Draw two more lines 1/4" apart from the original line that you drew going towards the unattached end of the right hand binding piece. (click on picture for better details)


Cut off excess binding.


Lay the 2 binding strips back on top of the quilt in their normal positions.


Bring the right sides together of the right and left hand binding strips and flip so that you now have the wrong side facing you.  If you scrunch your quilt here it will be easier.


Place a pin in the middle and at either end.  At the ends you will notice that you will have points extending beyond the regular line of the binding.  This is the way is should look.  See areas in green circles. (click on picture for better details)


Add a couple of extra pins to ensure nothing shifts.


Now you sew down the middle line of the three that were drawn.
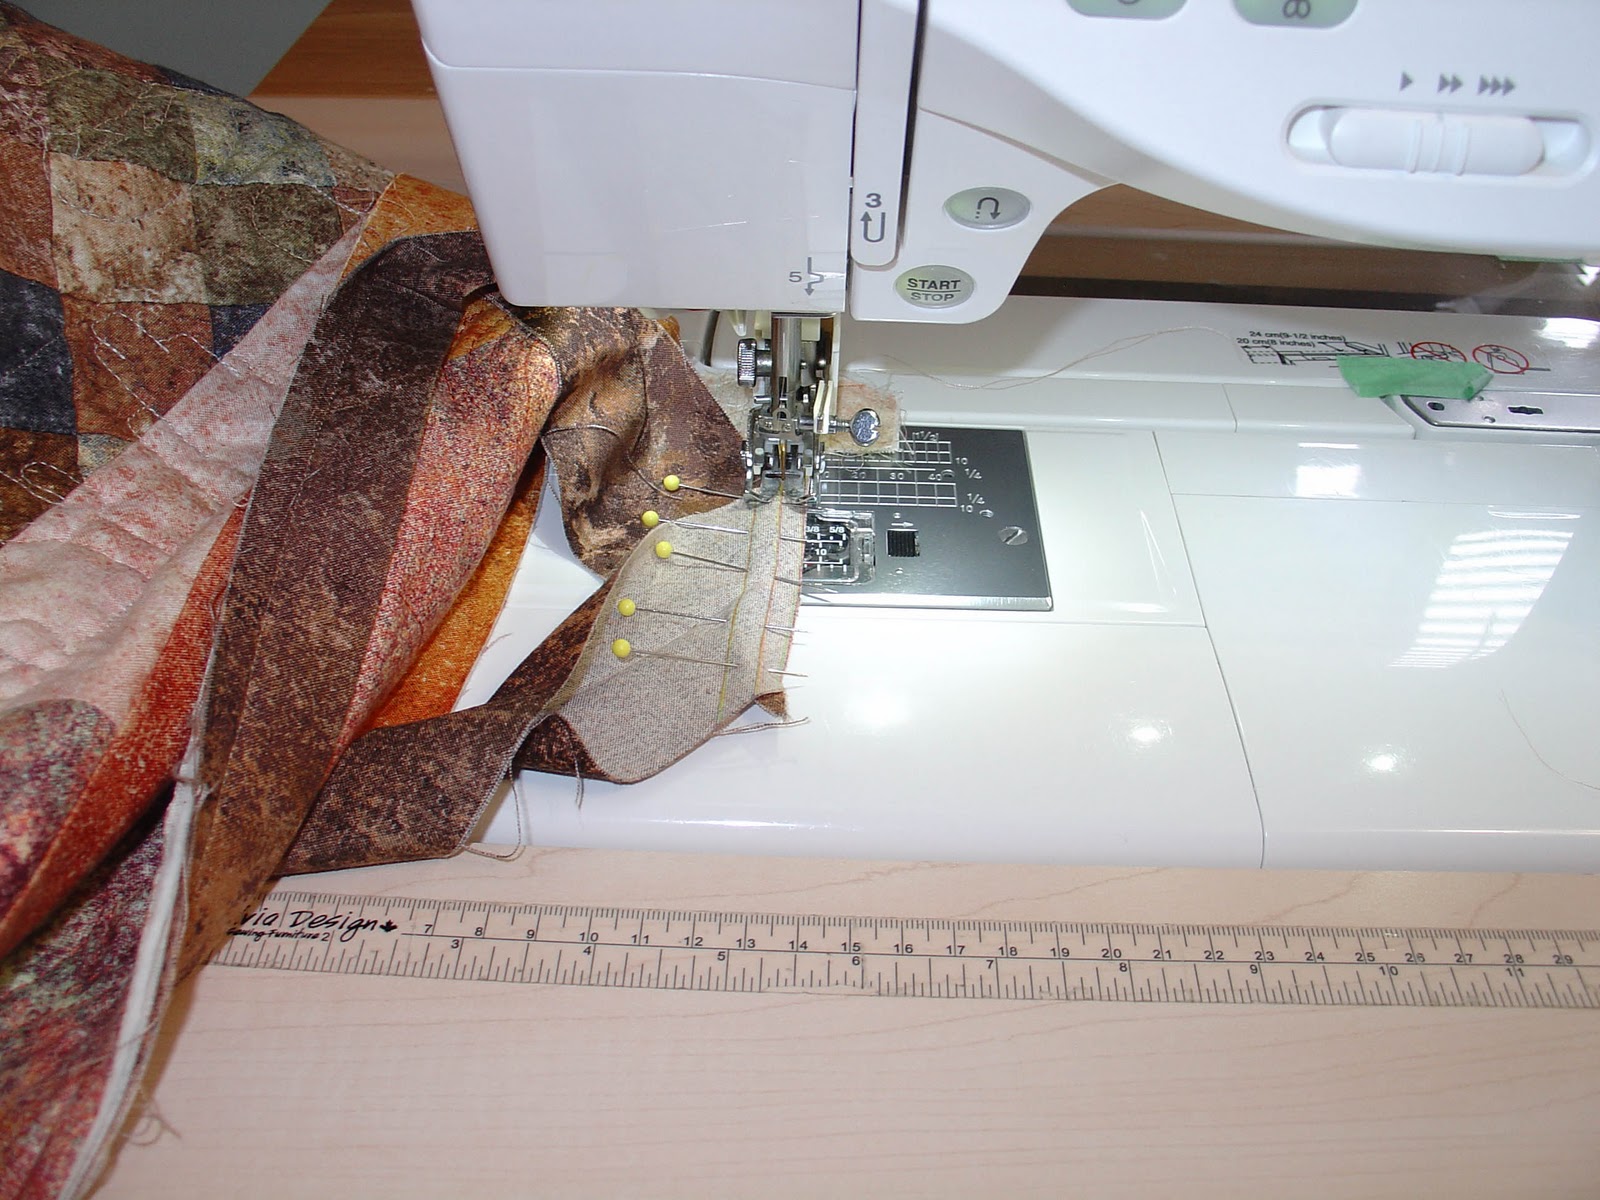

Take the pins out and finger press the seam open.


Fold the binding back into position and check to see that it is the appropriate length.  At this point you can trim the points.


Now finish sewing the rest of the binding.  As you can see from my binding it was the right size for this quilt.


I hope that is has been of help and if you have any questions please feel free to ask and I will try to help you out.

Tuesday, July 27, 2010

Batik Gems - Part 4

I started piecing the columns together this evening and I was still having some troubles with the batik fabrics wanting to go down into the bobbin area.  I'm using a brand new Schmetz Microtex needle which are the extra sharp ones they recommend for batik fabrics because of their denser weave. 

Wanda of Exuberant Color http://exuberantcolor.blogspot.com/ made a comment on part 2 of this series that she thought I could make a single hole opening with tape and a piece of cardstock. Punch a hole with a 1/8" punch and tape it in place between the feed dogs.

Well I found some heavy plastic that is used to make templates and I cut a small square from that.  I didn't have a hole punch, but I used the pointy end of my seam ripper and placed a hole in the middle of the square.  I then trimmed it down to size to fit over the area of the opening and yet allow the feed dogs free movement.  I used some UHU Tac - removable adhesive putty to keep the plastic square in place and then tried out the new invention.


Here is the results.  Even the little squares sewed up very nicely and no pull what so ever.  So for the time being I will go with the make shift solution but I think a single hole opening throat plate will be on the wish list for future upgrades.  Thanks Wanda for your great suggestion.

Sunday, July 11, 2010

Cherish Nature - Part 1

I'm starting the preliminary work on a new quilting project that is going to be based on Moda's Cherish Nature fabric and the pattern that they developed for this fabric.  I found out a little while ago that our cat sitter Lyn is going to be 75 years young this September so I wanted to make a special quilt for her to commemorate this major milestone in her life. I've got 2 months which I hope will be doable.

I initially saw this fabric when several of the gals from our small quilt group went on a shop hop back in May and one of the gals bought a kit to make this quilt.  The fabrics were gorgeous.  Now I'm going to be modifying the pattern because first I wasn't able to get all the fabrics that they had recommended since I was trying to find them after they had been out for a while and second the size of the finished quilt would be too large for me to do the actual quilting on my machine.  Here is a picture of the original pattern.


I'm not going to be adding the final floral border which will reduce the size of the quilt by 12" both in width in length.  In addition I will be changing the small green border to the egg fabric that is on the brown background. The half square triangles will be slightly different in that I don't have the green bumble bee fabric, and in its place is the aqua bumble bee fabric.  I have the dark aqua sponged fabric but not the light aqua one so in it's place I have the natural sponged fabric. I do have the brown swirl fabric. 

Below is a picture of the full panel that portions will be used for the quilt.  I'm thinking that the other parts I may use on the back with Kaufman's fusion fabric in espresso.


The one thing that I wanted to do on this quilt is a trapunto effect on the egg borders.  This time I had a different idea from what I did with the cardinals on my Christmas quilts from last year.  I decided to take Misty Fuse and fuse it to some batting. Then using an egg shaped template, cut out egg shaped pieces from the batting.  Here is my test using the aqua egg fabric.


Next I placed the egg shaped pieces of batting with the Misty Fuse side down on the wrong side of the fabric over top of where the egg shapes are.

I folded over a piece of parchment paper and ironed on the egg shaped pieces of batting to the fabric.  When I ironed, I made sure to iron both sides to ensure a good bond with the Misty Fuse.


This is what the pieces of batting look like after they have been ironed onto the back of the fabric.


Next I put together my regular quilting layers of back fabric, batting and top fabric.


This is a picture from the top of the layers.


Then I free motion quilted around the egg shapes.  This is just a rough sample and there is some puckering because the fabric is not sewn down to anything else so it was moving a bit while I was quilting.  The egg in the lower right hand corner turned out the best.


This is a view from the side and as you can see the eggs do indeed have a dimension to them.

Saturday, March 20, 2010

Tips and Tricks - Narrow Inner Border

I've been asked how do I do the small inner borders that appear on several of my quilts so this is the step by step process that should explain the process. First you need to cut 1 inch strips of the fabric that you want to use for your inner border. Typically this fabric is a contrasting or complimentary fabric to the main body of fabrics in your quilt. This example that I'm showing is for the cats and dogs quilt and I'm making a teal inner border to give emphasis to the pale turquoise sashing as well as the bright outer border. If the sides of your quilt are longer than the width of the fabric then you will have to join 2 strips of fabric together to make then the appropriatate length, I always allow an extra 1/2" - 1" as a safety margin.
Next you have to press the strips of fabric in half lengthwise with the wrong sides together just as you do for bindings so that the right side of the fabric is on the outside.

Next you take your first strip and place it on the edge of one side of the quilt (raw edges to the edge of the quilt) and sew down using a 1/8" seam. Yes this seems rather small but there will be a second 1/4" seam going down when you sew on the large outer border so everything will be secure. The reason why I only use a 1/8" seam is that you don't want any stitching lines showing after the outer border goes on if your two 1/4" seams happen not to match exactly.
You continue the process with the other sides ensuring that border covers over the edge of the quilt. I personally find if I extend this inner border about a 1/4" beyond the quilt and start sewing it feeds better through my machine. This is just my preference.

Next comes the trimming of the ends that extend beyond the edges of the quilt.

This is what it looks like when all the inner borders have been sewing on.
Next you go and sew your regular large outer border on like you normally would. Here you see that my outer border fabric extends well beyond my quilt, this is because I'm doing a mytered corner border. Here you want to change you foot to a 1/4" seam foot which will let you guide the fabric for a consistent 1/4" seam.
This is the end result.

Sunday, November 8, 2009

Tips and Tricks - Modified Trapunto

I finally finished the test on the modified Trapunto and I have to say I'm pleased with the results and I'm going to use this technique for the birds in the border print. For those who are interested I've taken pictures of the steps I did in making the modified Trapunto birds and will provide an explanation underneath each photo. Note you can click on each photo for a larger version.

Here you take a piece of batting and place it underneath the birds (or what ever you want to create the Trapunto effect on) and free motion stitch the outline of the birds sewing together the fabric and batting. I initially using a fine bobbin weight tread on top so it wouldn't show too much and a regular cotton thread on the bottom. The second time I did this I used an invisible thread, YLI's Wonder Invisible thread in smoke colour on top for this colour of fabric.

Here is what it looks like on the back. I pulled the top thread to the back, tied them off and trimmed them.

Next you need a good pair of embroidery scissors and you trim away the batting close to your stitching lines.

This is what it will look like when you have finished trimming. You will have to be careful when trimming that you don't cut your quilt top. It's probably best to lay the fabric on a table top and trim away the batting that way so to quilt top doesn't get in the way of the scissors.

Then you cut another piece of batting to fit the whole piece of fabric and your backing fabric, make the sandwich and then free motion quilt around the birds. Here I used a Sulky rayon is a dark red and a Superior thread Bottom Line bobbin thread in dark red for the bobbin on the cardinal, but when I first did the chickadee I still had basic cotton thread in the bobbin. On the cardinal I quilted the wing with too much detail so my next trial is to only do the outline like I did with the chickadee.


Here is what the back looks like.

Here's the details of the chickadee.


This is the second trial where I only did the outline of the cardinal's wing.

I did a third on on a light coloured fabric so that you could better see the Trapunto effect because I couldn't get a good picture to show you that it really does work. So I would say it's a success and now to start cutting pieces of batting for all my birds.

Wednesday, December 3, 2008

Tips & Tricks - Fusible Web

I had some interesting results with my fusible web experiment. As I mentioned in my previous couple of blogs I was having issues with the "Steam a Seam 2" product and was going to try using Misty Fuse along with freezer paper for the design part. For some reason I was wondering if by chance the Misty Fuse would penetrate the fabric and actually try to adhere to the freezer paper. Well my suspicions turned out to be correct. Below is a picture of the end result of my trying to take the freezer paper off the fabric after I cut out my tree. As you can see some of the fabric is stuck on the branches of the freezer paper.


So what to do now. I had a look at the Misty Fuse package and it mentioned that you can draw your design on the parchment paper. Then when you place Misty Fuse over it and the fabric on top and go to iron the sandwich the Misty Fuse with pick up the image off the parchment. Well it was worth a try. for dark fabrics they recommended a white marker pencil, but I only had a yellow one. Below is the end result and it worked. Now the lines weren't nice and smooth but they were OK to work with for this size of piece. I would want a better quality of line for large pieces. I think I will experiment with different types of markers later when I have some free time to see if there are some that work better than others.

This was very easy to cut out since you just have a layer of fabric with a thin coating of Misty Fuse.

Here is my landscape with the fixed tree in place.