Happy Thanksgiving Day everyone. Yes it's Thanksgiving Day here in Canada. Soon the smell of turkey cooking will fill the air. Yes we are doing the traditional roast turkey, stuffing, gravy, mashed potatoes, peas, sweet potatoes, cauliflower and pumpkin pie meal. Also going to have a salad so like most people more food than you really need but then everyone will be able to pick their favorites and if they don't like something they don't have to take any.
The leaves here are starting to turn colour but they are not at their peak. Here are a couple of pictures that I took from my balcony this morning. I suspect it will be another week or so before the colours will be in full force.
I wish everyone a very happy Thanksgiving Day and to my American friends a happy Columbus Day.
Monday, October 8, 2012
Saturday, October 6, 2012
Alpaca Wall Hanging - Part 3
I completed the Alpaca Wall Hanging last weekend but unfortunately my internet connection was down. Eventually Bell was able to determine that it was a faulty cable and they shipped out a new cable mid this week. I have to say it was very strange not having access to the internet and e-mail. I don't have one of those smart phones so I wasn't able to get access through more modern means.
So here is a picture of the finished wall hanging,
The final quilt is actually different from my initial plans which were to do thread painting. As you recall I had various issues so this is the simplified version. I decided to leave the alpacas alone and only do a simple outline quilting and not even touch any part of them. On the previous one where all the thread painting was a mess I tried doing some outline work of their facial features and the alpacas started to look like cartoon characters so that told me to leave well enough alone and keep this very simple. I'm very pleased with the border treatments and the Celtic knot work and the couching using alpaca yarn.
I won't be starting my next quilting project until November because we are in the process of packing and will be moving at the end of the month. We are not going far, just one floor up in our apartment building so now we will be in a penthouse unit with nobody over top of us making all kinds of noise waking with heavy shoes on hardwood floors. Have a great weekend.
So here is a picture of the finished wall hanging,
The final quilt is actually different from my initial plans which were to do thread painting. As you recall I had various issues so this is the simplified version. I decided to leave the alpacas alone and only do a simple outline quilting and not even touch any part of them. On the previous one where all the thread painting was a mess I tried doing some outline work of their facial features and the alpacas started to look like cartoon characters so that told me to leave well enough alone and keep this very simple. I'm very pleased with the border treatments and the Celtic knot work and the couching using alpaca yarn.
I won't be starting my next quilting project until November because we are in the process of packing and will be moving at the end of the month. We are not going far, just one floor up in our apartment building so now we will be in a penthouse unit with nobody over top of us making all kinds of noise waking with heavy shoes on hardwood floors. Have a great weekend.
Tuesday, September 11, 2012
Alpaca Wall Hanging - Part 2
I didn't get my alpaca wall hanging done last week. Partly it was due to the fact that I had issues with the thread painting and the other thing was I came down with a flu bug last week so that kind of did me in for doing much of anything last week.
The issues with the thread painting seem to be partly related to my embroidery hoop in that I couldn't get the fabric tight enough in the hoop. I did some more research and several sources said that the fabric inside the hoop should be tight as a drum. Well I just couldn't get my hoop tightened enough so that it was like a drum. After the first set of trees there was distortion to the quilt including pulling of the borders which hadn't even been quilted. Ironing did not get the distortion out. So I decided it was time to do more testing. But no matter what I did, including different stabilizers, I was still getting distortion. The other factor that likely was contributing to this issue was the fabric itself. The fabric was from Spoonflower and I had decided to go with their new Kona cotton which actually is a heavier weighted cotton than what I have used in the past. Here is a picture of the distortion.
If I had continued with thread painting the alpacas the distortion would really become unmanageable so it was time for a new game plan. I did some new testing and will just go with doing some outline quilting of the trees and alpaca. This is what the trees would look like.
Given the issues, the outline approach will have to do. For the borders I have plans to quilt a Celtic knot design that will be couched with alpaca yarn afterwards. So fortunately I got several panels printed of the photo at Spoonflower so I will be putting together a new quilt sandwich and starting all over again. Hopefully by next week I will have something to show you.
The issues with the thread painting seem to be partly related to my embroidery hoop in that I couldn't get the fabric tight enough in the hoop. I did some more research and several sources said that the fabric inside the hoop should be tight as a drum. Well I just couldn't get my hoop tightened enough so that it was like a drum. After the first set of trees there was distortion to the quilt including pulling of the borders which hadn't even been quilted. Ironing did not get the distortion out. So I decided it was time to do more testing. But no matter what I did, including different stabilizers, I was still getting distortion. The other factor that likely was contributing to this issue was the fabric itself. The fabric was from Spoonflower and I had decided to go with their new Kona cotton which actually is a heavier weighted cotton than what I have used in the past. Here is a picture of the distortion.
If I had continued with thread painting the alpacas the distortion would really become unmanageable so it was time for a new game plan. I did some new testing and will just go with doing some outline quilting of the trees and alpaca. This is what the trees would look like.
Given the issues, the outline approach will have to do. For the borders I have plans to quilt a Celtic knot design that will be couched with alpaca yarn afterwards. So fortunately I got several panels printed of the photo at Spoonflower so I will be putting together a new quilt sandwich and starting all over again. Hopefully by next week I will have something to show you.
Wednesday, August 29, 2012
Alpaca Wall Hanging - Part 1
Here is my latest project an Alpaca wall hanging. The image of the 2 Alpacas was kindly donated by a friend. The original image actually had these 2 Alpacas in front of a herd of other Alpacas. My friend Sue from Long Island was kind enough to ask her daughter who knows Photoshop inside and out to do some editing to take the 2 Alpacas out from the herd and then place them against a more neutral background. I then sent out the image to Spoonflower to get it printed to Kona cotton fabric. I used Kaufman's mist fusion in onyx for the narrow border and a gray Stonehenge for the large border.
Now I'm going to do a bunch of thread painting in the main image to define the Alpaca's features and add some texture to their fur. I then plan to add some variation of colour to the grass so it doesn't look so much like a golf green. Also I will add some definition to some of the trees in the background.
For the border I'm still testing out some ideas for a pattern that will first be quilted. Then I plan to bring out that quilting with some couching using some Alpaca yarn that I got a few weeks ago. Here is the yarn that I got.
I don't have a lot of time for this project since my deadline to get this one finished is next week Tuesday. I'm not sure if I will make it but this isn't a big wall hanging measuring at 28" by 32". I'll keep you posted.
Now I'm going to do a bunch of thread painting in the main image to define the Alpaca's features and add some texture to their fur. I then plan to add some variation of colour to the grass so it doesn't look so much like a golf green. Also I will add some definition to some of the trees in the background.
For the border I'm still testing out some ideas for a pattern that will first be quilted. Then I plan to bring out that quilting with some couching using some Alpaca yarn that I got a few weeks ago. Here is the yarn that I got.
I don't have a lot of time for this project since my deadline to get this one finished is next week Tuesday. I'm not sure if I will make it but this isn't a big wall hanging measuring at 28" by 32". I'll keep you posted.
Thursday, August 23, 2012
Gerber Daisy Wall Hanging - Part 5
The Gerber Daisy wall hanging got finished this past weekend and then I was off visiting friends out of town including Karen who had her birthday yesterday and this quilt was for her. She totally loved it and Gerber daisies are her favorite flower. Here is a picture of the finished quilt.
I didn't have enough of the forest mist fusion fabric so the binding was done in the onyx mist fusion. It turned out great in that the onyx colour acted like a frame for the quilt. For the quilting I did some Gerber leaves in the lower area around the Gerbers as well as some stylized ferns. At the top of the quilt I did Wisteria and a hummingbird. The borders were quilting with silhouettes of hummingbirds going around the quilt. Here are the details of the quilting. First the Gerber leaves.
This is the fern.
Here is the wisteria.
This is the hummingbird, it is a amethyst throated hummingbird.
This is the quilting in the borders.
I really enjoyed making this quilt wall hanging for Karen. It's size is 36" wide by 38" tall. The interesting thing is not only does she have Gerbers growing in her garden but she also has ferns and wisteria in her garden and hummingbirds do come to visit her garden.
I didn't have enough of the forest mist fusion fabric so the binding was done in the onyx mist fusion. It turned out great in that the onyx colour acted like a frame for the quilt. For the quilting I did some Gerber leaves in the lower area around the Gerbers as well as some stylized ferns. At the top of the quilt I did Wisteria and a hummingbird. The borders were quilting with silhouettes of hummingbirds going around the quilt. Here are the details of the quilting. First the Gerber leaves.
This is the fern.
Here is the wisteria.
This is the hummingbird, it is a amethyst throated hummingbird.
This is the quilting in the borders.
I really enjoyed making this quilt wall hanging for Karen. It's size is 36" wide by 38" tall. The interesting thing is not only does she have Gerbers growing in her garden but she also has ferns and wisteria in her garden and hummingbirds do come to visit her garden.
Monday, August 13, 2012
Gerber Daisy Wall Hanging - Part 4
All 5 Gerbers have been appliqued and the details of the petals have been stitched in. This is what the wall hanging looks like at this point.
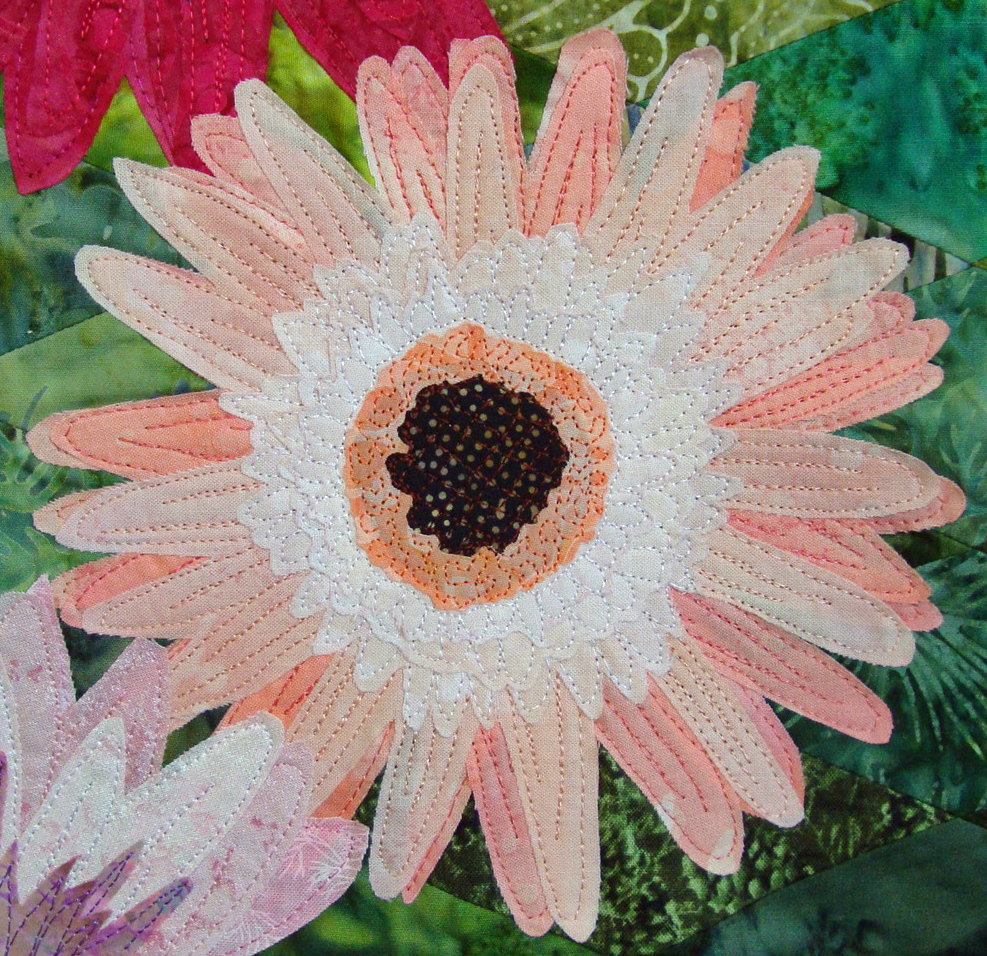
It may be a bit difficult to see some of the details on the flowers so I have some close up shots. Here is the first Gerber. On this Gerber I used printed batiks.
Here is the second one and on this one I used hand dyed and printed batiks.
On the third one I used Fossil Fern fabrics.
The forth one has hand dyed batiks, a mist fusion and a Fossil Fern.
On the last Gerber I used a mist fusion, a couple of fairy frosts, a printed batik and a hand dyed.
On the Gebers there are anywhere from 3 to 5 thread changes (excluding the dark brown center). I'm using Madeira's Polyneon polyester thread. The thread is made in Germany, was developed for machine embroidery so it's very durable and the colour selection is amazing. The other nice thing is the price is great, especially if you are on a budget. I do love my Superior Threads, they are expensive and they are worth it, but it's hard to build a stash of thread when one is on a budget. My friend Sue introduced me to Madeira thread and she was introduced to it by a quilting teacher when she took a thread painting class. I got my thread spools from a company called All Stitch for $2.63 for 1,100 yards. They also ship to Canada which is great. Here is the thread that I'm taking about:
http://www.allstitch.net/department/sort-polyester-40-spools-color-card-order-10192.cfm
If you are looking into buying an assortment of threads I would suggest getting the colour chart first since they are made from the actual threads and you can see what the actual colours look like which are very different from what appears on your monitor.
Well time to start making the quilt sandwich.
It may be a bit difficult to see some of the details on the flowers so I have some close up shots. Here is the first Gerber. On this Gerber I used printed batiks.
Here is the second one and on this one I used hand dyed and printed batiks.
On the third one I used Fossil Fern fabrics.
The forth one has hand dyed batiks, a mist fusion and a Fossil Fern.
On the last Gerber I used a mist fusion, a couple of fairy frosts, a printed batik and a hand dyed.
On the Gebers there are anywhere from 3 to 5 thread changes (excluding the dark brown center). I'm using Madeira's Polyneon polyester thread. The thread is made in Germany, was developed for machine embroidery so it's very durable and the colour selection is amazing. The other nice thing is the price is great, especially if you are on a budget. I do love my Superior Threads, they are expensive and they are worth it, but it's hard to build a stash of thread when one is on a budget. My friend Sue introduced me to Madeira thread and she was introduced to it by a quilting teacher when she took a thread painting class. I got my thread spools from a company called All Stitch for $2.63 for 1,100 yards. They also ship to Canada which is great. Here is the thread that I'm taking about:
http://www.allstitch.net/department/sort-polyester-40-spools-color-card-order-10192.cfm
If you are looking into buying an assortment of threads I would suggest getting the colour chart first since they are made from the actual threads and you can see what the actual colours look like which are very different from what appears on your monitor.
Well time to start making the quilt sandwich.
Saturday, August 11, 2012
Gerber Daisy Wall Hanging - Part 3
I've been busy all week working on this wall hanging. I finished putting the borders on the diamond background and this is what it looks like now.
I also got all the Gerber daisies drawn out onto fabric and cut out. The back of my fabrics are fused with Misty Fuse. I've got them all arranged now onto the background and this is the layout that I'm going with.
I now have to mark the center position of each Gerber and then will remove each one. Next I will start with the darkest one at the top and start the ironing process to fuse it to the background. Once I have that flower in place I will work on stitching in the details of the petals for that flower. Once I've completed that one, then onto the medium red / fuchsia Gerber and repeat the process. Then it will be the peach one, followed by the bright pink one and last will be the pale pink with the mauve centre.
Then I will be ready to put together the quilt sandwich. I will outline the Gerbers as part of the quilting. Then I plan on doing some Gerber leaves, and I'm thinking of adding some Ostrich ferns over on the left hand side. I'm still not quite sure what will get quilted in the upper green area but my mind is thinking of possibly adding a humming bird to the mix. As the quilting evolves I'm sure this piece will speak to me and I will know what needs to go in the upper green area.
Well time to go back and carefully remove all my Gerbers from the background piece and start fusing the dark Gerber. Have a great weekend everyone.
I also got all the Gerber daisies drawn out onto fabric and cut out. The back of my fabrics are fused with Misty Fuse. I've got them all arranged now onto the background and this is the layout that I'm going with.
I now have to mark the center position of each Gerber and then will remove each one. Next I will start with the darkest one at the top and start the ironing process to fuse it to the background. Once I have that flower in place I will work on stitching in the details of the petals for that flower. Once I've completed that one, then onto the medium red / fuchsia Gerber and repeat the process. Then it will be the peach one, followed by the bright pink one and last will be the pale pink with the mauve centre.
Then I will be ready to put together the quilt sandwich. I will outline the Gerbers as part of the quilting. Then I plan on doing some Gerber leaves, and I'm thinking of adding some Ostrich ferns over on the left hand side. I'm still not quite sure what will get quilted in the upper green area but my mind is thinking of possibly adding a humming bird to the mix. As the quilting evolves I'm sure this piece will speak to me and I will know what needs to go in the upper green area.
Well time to go back and carefully remove all my Gerbers from the background piece and start fusing the dark Gerber. Have a great weekend everyone.
Subscribe to:
Posts (Atom)