Sunday, May 8, 2011

Jade's B-Day Quilt - Part 1

I'm starting on another quilt project.  This time my friend Jade will be turning 55 in July so this quilt I will be making for her.  I got the design from a book called Color Shuffle by Karla Alexander.


Here is the one I will be making but again I will be modifying it since the original pattern makes a twin size quilt and that is too large for my to comfortably quilt in my machine.  She used green and turquoise fabrics while I will be using green and blue fabrics.


Now again I have a beef with the author of this book and this particular pattern.  The block is based on a 10 1/2" squares of fabrics, 6 layers of various colour combinations, you them chop them up, shuffle certain sections and then sew back the block.  The cuts are based on the wonky principle so technically you aren't suppose to be worried about how exactly the blocks are cut as long as they look sort of similar to the diagram posted.  This is what is posted and there are no measurements given as per the nature of wonky block making. Once you put your block back together you are suppose to trim it down to an 8" block which when sewn into the quilt will result in a 7 1/2" finished block.
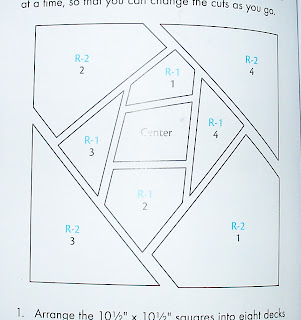

So I'm thinking great, this should go quickly and I don't have to worry about measuring things.  So I cut up my first set of 6 fabric squares, do the fabric shuffles and begin to sew up a block.  I then go to trim it and OOPS!!!!!  This is what I get, if I was to trim it down to the 8" I would be chopping off some of the points of the inner sections of the block.  Also no matter how I place the ruler I would end up cutting off some points.


So in reality the proportions of how this block is cut are important even though it is not stated in the book.  So I now have more scraps for the scrap bag and have to re-think this.  I'm now hoping that the diagram in the book is true to proportion in terms of the cuts and decide to measure it, calculate the percentages of each section and then convert them to what those sections would be based on the 10 1/2" block.  Here are my calculations.


I then try this out using just one piece of fabric, cut it up and then re-sew it to see if I can then trim it to the 8" block size without losing any points.  SUCCESS!!!  I then take my next pile of 6 fabrics and cut then according to my calculations and here are 2 finished blocks.


So I'm glad that I was able to figure out how to solve this problem but it annoys me to no end when you pay good money for a book only to get faulty instructions and end up wasting fabric.  It's bad enough when I screw up and do the wasting, but I don't need to waste fabric based on someone else's screw ups or omissions. Fortunately I'm the type that always buys more fabric than the patterns call for, because of these just in case moments, otherwise what would one do?  Still I would prefer to have the spare fabric for some other crafty projects :-) instead of using it all up because of screw ups :-(.

Blog Hacked and Hijacked

My friend Hetty had her blog hacked and hijacked by someone in France.  She no longer can access anything on her blog, make changes or create new posts.  This world is just getting so warpped when people feel the need to steal your blog and for what purpose. I feel for you my friend and I'm glad that after a couple of days of wondering what the hell happened and why me you are back with a new blog.  Hetty can be reached at: http://hettyscreations2.blogspot.com/

So if you have been a follower of Hetty's blog this is where you can find her, and if you haven't please go and check her new blog out.  Best wishes to you Hetty and your new blog.

Sunday, April 24, 2011

A Celebration of Quilts XI - York Heritage Quilters Guild


The quilt guild that I belong to, the York Heritage Quilters Guild will be holding their 11th quilt show this coming November.  It will be held at the Japanese Canadian Cultural Centre in North York Ontario from Friday November 11th through to Sunday November 13th.  You can click on the "Art for Body and Soul" button on the right hand side of my blog to take you to the quilt show web site for further details.

The show is sponsoring the charity called Sketch, a Toronto organization creating opportunities for street involved and homeless people ages 15-29, to engage in the arts in a cross-discipline studio environment or in the community. The are holding a mini quilt auction of quilts that are donated by members of our guild.  I am currently working on one piece and will likely make a second one.  Here is a picture of my first piece.  I have finished the quilting. I have used a wonderful piece of fabric designed by Phillip Jacobs and next plan to embellish it with beads.  The piece will be about 12" square when finished.


So for those of you in the Toronto area, or if you are going to be visiting in November I hope you can come out and see the show.

Saturday, April 16, 2011

Elaine Quehl Workshop In Full Bloom - Part 6

I was thinking about the border treatment for the poppy wall hanging and I did a bit of experimentation today using some techniques from Seminole Quilting.  Some of you may ask what is Seminole Quilting.

"The Seminoles are American Indians that live in the Southeastern United States in the States of Florida and Southern Georgia. Seminole quilting originated from the Seminole patchwork used for clothing by these southeastern Native Americans. In the late 1800s it was a long trip from the Everglades to trade for cotton cloth so women began sewing strips made from the fabric left on the end of the bolts to make what was know as "strip clothing". It involves sewing solid pieces of fabric together to form designs in strips. These strips are joined together to form decorative bands of fabric which are often used in skirts, blouses and other articles of clothing. Often quite a variety of colorful fabrics are used in a single garment." From article found on: http://www.eldrbarry.net/im/meg/semstyle.pdf

So I decided to try and make a diamond border here are my steps.  I first cut 3 strips of fabric 1 1/2" wide and sewed them together.


Next cut the strip into 1 1/2" pieces and when you go to sew them you have to step them as I have shown in this picture.  The tricky part here is once the two pieces are stepped, when you start to sew, if you start at the end you are sewing on a single thickness of fabric which often wants to get sucked into the machine, even with a throat plate that is designed with just the small hole for the needle.  So what I ended up doing is starting each piece part way in so unfortunately you can't chain piece these.


Once it is pieced together and ironed this is what it looks like.


This is what the diamond border looks like with the poppy.


So this project is now on hold since my fabics are on back order.  Hopefully I will get them within the month.

Tuesday, April 12, 2011

Elaine Quehl Workshop In Full Bloom - Part 5

I was going through my stash of fabric and it's interesting when you think you have a decent stash and should be able to find all kinds of great fabrics to use for backgrounds and borders, but it turned out that a lot of the fabrics just weren't quite right.  Either too light, the wrong tone, didn't fit well with all the hand dyed and batiks fabrics but I think I have found a combination that will work.  I have two options.  Now when you look at these pictures you will have to use your imagination as to how this would look like as a whole wall hanging. I only have fat quarters of them but fortunately they are Hoffman Bali hand dyed watercolours (style # 1895) so I can get more of them. Here is the first:


Here is the second one, and the only difference is the outer border fabric.  I'm leaning towards the second one since that outer border fabric just looks a bit richer than the first one.  What do you think?


This may help everyone to see the difference between the first outer border fabric and the second one since my camera hasn't done the best job of distinguishing between the two.  I went and got the fabric samples from the Hoffman web site.  So in the first version the fabric was called 571-Barbecue.


The second fabric was called 241-Sonoma.

Sunday, April 10, 2011

Elaine Quehl Workshop In Full Bloom - Part 4

I finally made some progress on the poppy wall hanging this weekend.  I got all the applique fabric pieces off the design wall, labelled on the back, then ironed onto the muslin and the poppy cut out.  It was very important when I took off each piece that I labelled it on the back so it was easy to know where it went back on and also I sorted them by each petal from A to K so I knew what order they had to go in.  I think the numbering and making sure everything was in the right pile took longer then when I actually sat down to iron everything in place.  That bit of organization was well worth the effort.  Here is a picture of the poppy with all the pieces ironed on.


Now this looks a bit different from the previous picture because I did make some changes to selected pieces where either the contrast in fabric was too much or too little between adjoining pieces.  So once this was completed the next step is to cut out the poppy from the muslin and this is what that looks like on my design wall.


So I'm now ready to addition background and border fabrics for this wall hanging.

I also have to tell you another funny story.  While the poppy was up on the design wall before the pieces were ironed on the centre of the flower (the little green pieces from the seed pod) kept dropping off the wall.  I get tired of hunting for those little pieces so I thought I will fix you, and iron you onto the brown seed pod piece ahead of time.  So I got things set up on my towel that I was using when I was originally pressing the steam a seem onto the fabric to get all my pieces, and as I put the iron to the seed pod I realized that was a really dumb move.  Why you may ask, well the brown seed pod also has the steam a seam on the back of it, so I just ended up ironing on my seed pod to the towel I was using.  Fortunately it was only a cheap dollar store towel, I had lots of fabric left to make another one and I had a good laugh.  Here's my decorated towel.

Wednesday, March 23, 2011

March Madness - 200th Post Giveaway Winners

Thanks everyone who entered my 200th post giveaway.  Interesting that this time I only had 5 people who actually entered.  I don't know if perhaps last week being spring break people were away or perhaps the books and fabrics just didn't appeal to folks.  My 100th post giveaway had 27 responses. So this one makes it for great odds for those who replied.

The winner of the Dresden plate template, the book Dresden Plates of Distinction and the fabric is Gina (AKA CatWhiskers).

The winner of the Quilters Home Fall book and fabric is Mary (AKA Needled Mom).

I also have some bundles of fabric here that I was going to have for a my choice giveaway for a favourite comment (or two).  Since there are only 3 people left, Angela, Hetty and Elizabeth (AKA Sand and Sunshine), and all of you are my loyal followers each of you will receive a package of fabrics as a thank you for reading my blog and providing such wonderful encouragement.

Thanks ladies for participating and please send me your snail mail addresses.  I have to get mailing envelopes sometime over the weekend, and then I will ge the packages out to you next week.

Enjoy the rest of your week and happy quilting.

Vicki