Sunday, January 20, 2013

I've been working on the Lotus applique design and it has taken some time to get things right in terms of size and proportion. I think things would go faster if I was a trained artist but I'm not. So here is what I have so far.


I will now start working on making my applique patterns, first working on the leaves, then the seed pod, then the Lotus buds and finally the actual flowers. This may not be the final arrangement since one I have the actual applique pieces done in the different fabrics I may decide to move a few things around or perhaps realize I may need to add something else or even take something out.

Then what I plan on doing for the diamond background area is quilting in a continuation of the Lotus pond with leaves, buds, seed pods and a flower or two. Here are some pictures of what Lotus ponds look like.


For the border quilting I'm thinking of coming up with a stylized Lotus flower design, hopefully it will work. 

So time to start working on creating the actual applique patterns.


Tuesday, January 15, 2013

Tranquil Garden - Part 2

I finally have finished the background for the Tranquil Garden wall hanging. Here is what it looks like at the moment.


I was hoping to just use what I had in my stash for this project but I didn't have anything suitable for the outer border of which there was enough yardage. Most of what I had were FQs or slightly larger pieces and I needed more like a yard so that I had enough for the borders plus the binding. So last week I made a trip out to one of the few quilt shops that is left in Toronto Sew Sisters. I found a nice dark blue and teal Kaufman batik and it sets off the diamonds very nicely. So many quilt shops have closed in our city that now I have a major trip across the city if I want to get something. I do have to give Sew Sisters two thumbs up for having a pretty decent selection of batiks and the price was right at $10.98 a meter. You can check them out at:  http://www.sew-sisters.com/

Here is a close up of my piecing of the of diamonds. I'm very pleased with how the intersections came together and all I can say is that you have to have patience and you have to pin your rows together when you are joining everything.


Now I'm back working on the designs for the Lotus flowers, buds, seed pod and leaves. I've got some done but still more to develop and audition before I make my final decisions on which ones will make the final cut for the wall hanging. Enjoy your week.

Wednesday, January 9, 2013

Balcony Visitor

I had an interesting visitor come to our balcony this afternoon. It was a bird of prey. I'm not sure if it was a hawk or a falcon but either way he was quite spectacular. He sat there for quite some time surveying the area for pigeons before finally taking off to catch his lunch.


Jordie eventually noticed something sitting on the balcony but he wasn't quite sure what this was. It certainly wasn't the normal pigeon or crow. He went and sat on the chair near the window and stared but didn't make his normal chattering noises that he makes for the regular birds.

Tuesday, January 1, 2013

2013 New Years Goals


I hope everyone has had a pleasant New Years Day.  As in previous years I went out with friends last night to a lovely French restaurant to ring in the New Year. It was a great time catching up with good friends and a most enjoyable meal. Today has been a quiet laid back kind of day. I did some work on my Tranquil Garden wall hanging and also took some time to relax.

I've done my review of projects that I would like to get done this year, and here is the list. As always it will be interesting to see what gets completed, what doesn't and what new projects come along.

I also listed my UFOs that have no commitments at this time for completion and this list I only added one new project from 2011 so that's not too bad. I think as quilters it seems that everyone has the never ending supply of UFOs.

Jan: Finish Tranquil Garden wall hanging
Mar: Sawtooth Cats paper pieced quilt - new project, this is a pattern from City Quilter.  Here is the link and just scroll down about 3/4 of the way down: http://www.citystitcher.com/quilts.php
May: Finish Tranquil Moments lap quilt.  This is the one I started on my last trip to Hawaii.
Summer: work on my reverse applique Sea Turtles quilt
Fall: Finish Falling Splendor quilt

UFOs that are outstanding: I wonder if any of these will come off the plate this year
Hawaiian orchid pillow – hand quilting
Small Wall Hanging (that was to go into a silent auction) – quilting done, need to finish beading and sew binding
Lone Star - project just started
"In full Bloom - Poppy" from Elaine Quehl's workshop - add borders and quilt

I'm certain that there will be other new projects that will come up during the year that aren't planned at the moment so this year I'm trying to leave enough space for those project to happen and then I don't have to put others on hold. I'm not planning on any seminars or classes this year but that also could change if I see something that really sounds unique or interesting.

Happy New Year everyone.

Monday, December 31, 2012

2012 New Years Goals - Final Review


Another year is coming to an end, where did the time go?  First I have to say that I'm still working on the background for my Tranquil Garden wall hanging. I had the misfortune of the temporary design wall falling off the wall before I started sewing all the diamonds on. The good thing was I did have pictures of what it all looked like so I was able to put it all back the way it should be. That took almost as long as putting it up in the first place between getting all the diamonds picked up and sorted by shade and then making sure I got the right one up in the right place. I'm almost finished sewing the individual rows and then will just have to sew the rows together. That should be done this week sometime.

So today it's time to take a look at what I had set out as my goals for this year, what was I able to accomplish, what didn't happen and what else came along. First is a list of my original goals and what happened with each one.

Jan: Finish quilting the 2 wall hangings from Gloria Loughman’s workshops - completed
Jan: Develop my design for the reverse applique quilt "Sea Turtles" - completed
Feb: Create the "Sea Turtles" quilt top - on hold
Mar: Finish the quilt top "In full Bloom - Poppy" from Elaine Quehl's workshop - on hold
Apr: Design and create the quilt top for the shoe wall hanging called "Stiletto Heels" - cancelled
May: I'm signed up for Hollis Chatelain's workshop "Quilt Line as the Third Design Element" and need to bring in 3 quilt tops for discusion and quilt design creation. My plan is to take the "Sea Turtles", "In Full Bloom - Poppy" and "Stiletto Heels" quilt tops. - completed
Jun: Finish quilting "In full Bloom - Poppy" so it is ready to give to my mom for her 90th birthday in August - on hold
Jul: Attend Ricky Tim's Super Quilt seminar being held in Rochester NY. I enjoyed this so much when I went to Cape Cod back in 2010, that when I saw it being held so close to home, I figured it would be worth while to attend a second time and hopefully several of the gals from my small quilt group will also come. - completed
Jul - Aug: Finish quilting "Sea Turtles" - on hold
Sep: Finish quilting "Stiletto Heels" - cancelled
Oct: Finish Falling Splendor quilt  - on hold
Christmas charity quilt: Using blocks from the Friday Block Party 2009 - cancelled

Any time: 1: One block wonder quilt ( I already have the fabric and am curious as to how this will turn out) - never started
2: Start my own unique design of a Rhapsody quilt based on Ricky Tims techniques – the plan here is to have a completed design ready to start a quilt the following year, this in my books is a major project - never started
3: Create a landscape quilt based on the Picture Piecing techniques of Cynthia England - never started

UFOs that are outstanding: I wonder if any of these will come off the plate this year
Hawaiian orchid pillow – hand quilting
Kaffe Fassett – colour in design diamond quilt - cancelled and I donated the blocks and left over fabric to the community quilt group at my guild so that they can make somethng for one of the charities that they support
BOM: Drunkard’s Path Variations - cancelled (no longer have interest in this project)
Tranquil Moments quilt – quilting left to do
Small Wall Hanging (that was to go into a silent auction) – quilting done, need to finish beading and sew binding
In addition the following new projects happened in 2012:
Mar: Spirit of the Land - completed
Apr: Lone Star: - started and then put on hold
Jun: Oriental Odyssey - completed
Jul: Gerber Daisy Wall Hanging - completed
Oct: Alpaca Wall Hanging - completed
Dec: Tranquil Garden - started and to be finished in January 2013

So in addition to the 2 completed projects from the original list, 1 completed design and 2 seminars that I attended this year, I also completed 4 new projects and started 2 new ones of which the current one will be finished this coming month since it is a gift for someone and it needs to be given in January. I'm actually quite pleased with what I have been able to accomplish this year since I have continued to deal with medical issues for a good part of the year. After the doctors found a solution to the anemia and my blood levels were back to normal I was still dealing with a lot of fatigue so it was back to see more specialists and the thought was that it might be an autoimmune issue.

While I was in to see an ENT specialist for some tests he discovered that I had a lump on my thyroid. After several inconclusive biopsies it was decided to have both the lump and thyroid removed. That was the best decision ever since the pathology report did show that there was cancer in both the lump and thyroid. Fortunately it was caught in the very early stages and as of November I am in remission - YEAH!!! Also my anemia has stabilized since the surgery and I have not had to have any treatments in over 6 months. Somehow I think the two may have been related. I'm feeling much better, more energy and we even moved in November and I was able to pack up, clean and purge in Oct and unpack, sort and set up our new place and I still had energy for Christmas. What a difference a year makes.

So next I'm going to review what my goals are going to be for 2013 and then will post them hopefully on New Year's Day.

I wish everyone a very happy, healthy and prosperous New Year,
Vicki

Thursday, December 13, 2012

Tranquil Garden - Part 1

Yes I'm back and have started a new project. October and November were busy with packing, moving and unpacking. Boy is that a lot of work and I swear stuff grows and multiples at night so when you wake up the next day you find that there is even more stuff to do and you wonder when will it ever end.

I finally got my sewing room back in order about 2 weeks ago and was then able to pull out fabrics for my next project called Tranquil Garden. This is going to be another wall hanging quilt similar to the Gerbera Daisy one that I did over the summer but this time it is going to have Lotus Flowers as the main theme. The background is similar in that I'm doing the 2 1/2" diamonds cut on a 45 degree angle. The colours for the background are in the blue green to teal to blue shades. I have just finished the layout and just did the last switches of a few of the diamonds and I'm ready to start sewing. I find that after I'm done laying out this kind of background I always leave it for a few days and then come back and will often find a few blocks that need changing because the are either too dark or light based on their neighbours. Here is what it looks like.


The Lotus flowers will be raw edge appliqued and again will be my own design. I actually was very fortunate that back in 2006 when I went to Hawaii for the first time I visited Allerton Gardens in Kauai and they had a Lotus flower pond on their grounds. Here are a few pictures from that trip.


I'm planning to include at least one seed pod since they are very unique looking as well as a bud or two amongst the actual flowers. Originally I was hoping to have this quilt finished by the end of the year but unfortunately the move took longer that I had anticipated so I think this will be a January finish.

Monday, October 8, 2012

Happy Thanksgiving Day

Happy Thanksgiving Day everyone.  Yes it's Thanksgiving Day here in Canada.  Soon the smell of turkey cooking will fill the air. Yes we are doing the traditional roast turkey, stuffing, gravy, mashed potatoes, peas, sweet potatoes, cauliflower and pumpkin pie meal. Also going to have a salad so like most people more food than you really need but then everyone will be able to pick their favorites and if they don't like something they don't have to take any.

The leaves here are starting to turn colour but they are not at their peak.  Here are a couple of pictures that I took from my balcony this morning. I suspect it will be another week or so before the colours will be in full force.


I wish everyone a very happy Thanksgiving Day and to my American friends a happy Columbus Day.

Saturday, October 6, 2012

Alpaca Wall Hanging - Part 3

I completed the Alpaca Wall Hanging last weekend but unfortunately my internet connection was down.  Eventually Bell was able to determine that it was a faulty cable and they shipped out a new cable mid this week. I have to say it was very strange not having access to the internet and e-mail. I don't have one of those smart phones so I wasn't able to get access through more modern means.

So here is a picture of the finished wall hanging,


The final quilt is actually different from my initial plans which were to do thread painting.  As you recall I had various issues so this is the simplified version. I decided to leave the alpacas alone and only do a simple outline quilting and not even touch any part of them.  On the previous one where all the thread painting was a mess I tried doing some outline work of their facial features and the alpacas started to look like cartoon characters so that told me to leave well enough alone and keep this very simple. I'm very pleased with the border treatments and the Celtic knot work and the couching using alpaca yarn.

I won't be starting my next quilting project until November because we are in the process of packing and will be moving at the end of the month. We are not going far, just one floor up in our apartment building so now we will be in a penthouse unit with nobody over top of us making all kinds of noise waking with heavy shoes on hardwood floors. Have a great weekend.

Tuesday, September 11, 2012

Alpaca Wall Hanging - Part 2

I didn't get my alpaca wall hanging done last week.  Partly it was due to the fact that I had issues with the thread painting and the other thing was I came down with a flu bug last week so that kind of did me in for doing much of anything last week.

The issues with the thread painting seem to be partly related to my embroidery hoop in that I couldn't get the fabric tight enough in the hoop. I did some more research and several sources said that the fabric inside the hoop should be tight as a drum.  Well I just couldn't get my hoop tightened enough so that it was like a drum. After the first set of trees there was distortion to the quilt including pulling of the borders which hadn't even been quilted. Ironing did not get the distortion out. So I decided it was time to do more testing.  But no matter what I did, including different stabilizers, I was still getting distortion. The other factor that likely was contributing to this issue was the fabric itself. The fabric was from Spoonflower and I had decided to go with their new Kona cotton which actually is a heavier weighted cotton than what I have used in the past.  Here is a picture of the distortion.


If I had continued with thread painting the alpacas the distortion would really become unmanageable so it was time for a new game plan.  I did some new testing and will just go with doing some outline quilting of the trees and alpaca. This is what the trees would look like.


Given the issues, the outline approach will have to do.  For the borders I have plans to quilt a Celtic knot design that will be couched with alpaca yarn afterwards. So fortunately I got several panels printed of the photo at Spoonflower so I will be putting together a new quilt sandwich and starting all over again. Hopefully by next week I will have something to show you.


Wednesday, August 29, 2012

Alpaca Wall Hanging - Part 1

Here is my latest project an Alpaca wall hanging. The image of the 2 Alpacas was kindly donated by a friend.  The original image actually had these 2 Alpacas in front of a herd of other Alpacas.  My friend Sue from Long Island was kind enough to ask her daughter who knows Photoshop inside and out to do some editing to take the 2 Alpacas out from the herd and then place them against a more neutral background.  I then sent out the image to Spoonflower to get it printed to Kona cotton fabric.  I used Kaufman's mist fusion in onyx for the narrow border and a gray Stonehenge for the large border.


Now I'm going to do a bunch of thread painting in the main image to define the Alpaca's features and add some texture to their fur.  I then plan to add some variation of colour to the grass so it doesn't look so much like a golf green. Also I will add some definition to some of the trees in the background.

For the border I'm still testing out some ideas for a pattern that will first be quilted.  Then I plan to bring out that quilting with some couching using some Alpaca yarn that I got a few weeks ago. Here is the yarn that I got.


I don't have a lot of time for this project since my deadline to get this one finished is next week Tuesday. I'm not sure if I will make it but this isn't a big wall hanging measuring at 28" by 32". I'll keep you posted.

Thursday, August 23, 2012

Gerber Daisy Wall Hanging - Part 5

The Gerber Daisy wall hanging got finished this past weekend and then I was off visiting friends out of town including Karen who had her birthday yesterday and this quilt was for her. She totally loved it and Gerber daisies are her favorite flower. Here is a picture of the finished quilt.


I didn't have enough of the forest mist fusion fabric so the binding was done in the onyx mist fusion.  It turned out great in that the onyx colour acted like a frame for the quilt. For the quilting I did some Gerber leaves in the lower area around the Gerbers as well as some stylized ferns. At the top of the quilt I did Wisteria and a hummingbird. The borders were quilting with silhouettes of hummingbirds going around the quilt. Here are the details of the quilting. First the Gerber leaves.


This is the fern.


Here is the wisteria.


This is the hummingbird, it is a amethyst throated hummingbird.


This is the quilting in the borders.


I really enjoyed making this quilt wall hanging for Karen.  It's size is 36" wide by 38" tall. The interesting thing is not only does she have Gerbers growing in her garden but she also has ferns and wisteria in her garden and hummingbirds do come to visit her garden.

Monday, August 13, 2012

Gerber Daisy Wall Hanging - Part 4

All 5 Gerbers have been appliqued and the details of the petals have been stitched in. This is what the wall hanging looks like at this point.


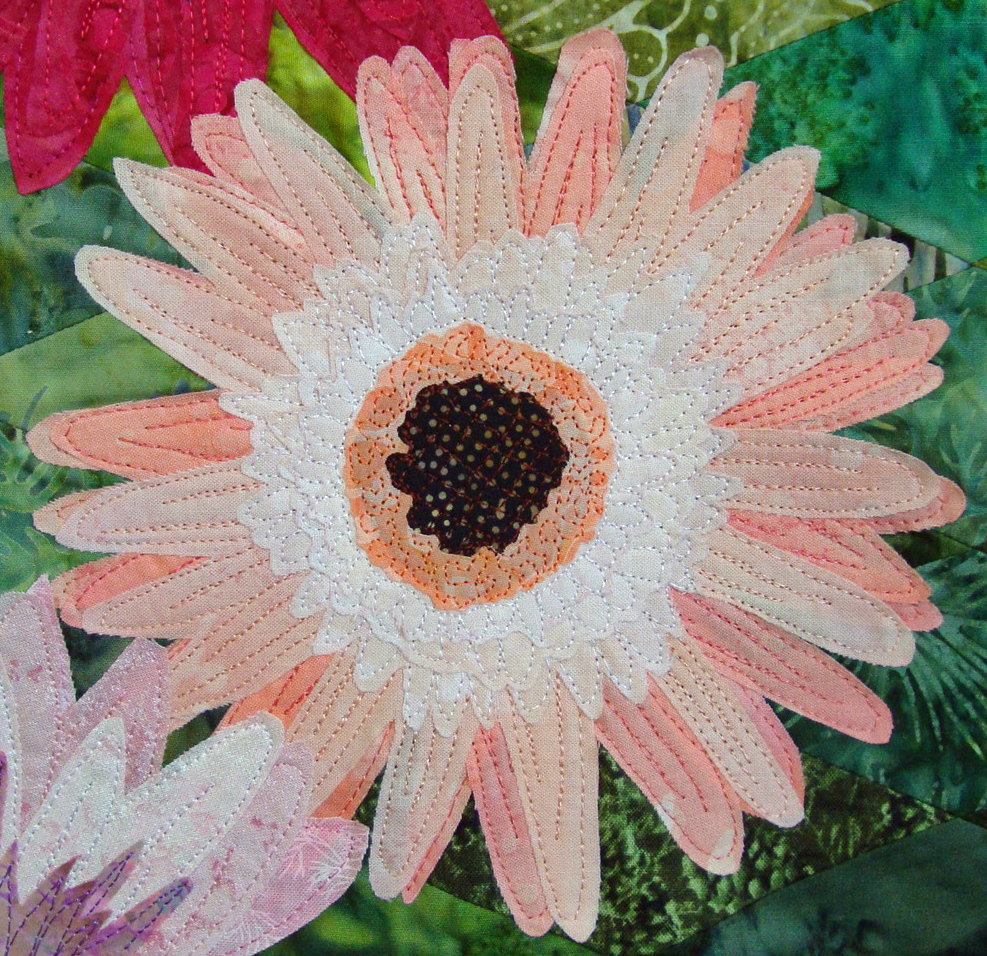
It may be a bit difficult to see some of the details on the flowers so I have some close up shots. Here is the first Gerber. On this Gerber I used printed batiks.


Here is the second one and on this one I used hand dyed and printed batiks.


On the third one I used Fossil Fern fabrics.


The forth one has hand dyed batiks, a mist fusion and a Fossil Fern.


On the last Gerber I used a mist fusion, a couple of fairy frosts, a printed batik and a hand dyed.


On the Gebers there are anywhere from 3 to 5 thread changes (excluding the dark brown center). I'm using Madeira's Polyneon polyester thread.  The thread is made in Germany, was developed for machine embroidery so it's very durable and the colour selection is amazing. The other nice thing is the price is great, especially if you are on a budget. I do love my Superior Threads, they are expensive and they are worth it, but it's hard to build a stash of thread when one is on a budget.  My friend Sue introduced me to Madeira thread and she was introduced to it by a quilting teacher when she took a thread painting class. I got my thread spools from a company called All Stitch for $2.63 for 1,100 yards. They also ship to Canada which is great. Here is the thread that I'm taking about: 
http://www.allstitch.net/department/sort-polyester-40-spools-color-card-order-10192.cfm
If you are looking into buying an assortment of threads I would suggest getting the colour chart first since they are made from the actual threads and you can see what the actual colours look like which are very different from what appears on your monitor.

Well time to start making the quilt sandwich.


Saturday, August 11, 2012

Gerber Daisy Wall Hanging - Part 3

I've been busy all week working on this wall hanging. I finished putting the borders on the diamond background and this is what it looks like now.


I also got all the Gerber daisies drawn out onto fabric and cut out. The back of my fabrics are fused with Misty Fuse. I've got them all arranged now onto the background and this is the layout that I'm going with.


I now have to mark the center position of each Gerber and then will remove each one. Next I will start with the darkest one at the top and start the ironing process to fuse it to the background.  Once I have that flower in place I will work on stitching in the details of the petals for that flower. Once I've completed that one, then onto the medium red / fuchsia Gerber and repeat the process. Then it will be the peach one, followed by the bright pink one and last will be the pale pink with the mauve centre.

Then I will be ready to put together the quilt sandwich. I will outline the Gerbers as part of the quilting. Then I plan on doing some Gerber leaves, and I'm thinking of adding some Ostrich ferns over on the left hand side. I'm still not quite sure what will get quilted in the upper green area but my mind is thinking of possibly adding a humming bird to the mix. As the quilting evolves I'm sure this piece will speak to me and I will know what needs to go in the upper green area.

Well time to go back and carefully remove all my Gerbers from the background piece and start fusing the dark Gerber. Have a great weekend everyone.

Friday, August 3, 2012

Gerber Daisy Wall Hanging - Part 2

I finished sewing all the diamonds together for the background layer of the Gerber daisy wall hanging. I'm very pleased with how it turned out and this is what it looks like.


I now just have to add the narrow pink border and the wider mid to dark green border.  I'm going to wait until I have my pink Gerbers cut out and placed against the background so that I can then audition the border fabrics to make sure I pick the ones that will best compliment both the background and the flowers.

Now working with these diamonds and the bias edges does have its challenges, the biggest ones being that you don't distort or stretch the diamonds while sewing &/or pressing them.  When I first ironed all my fabric I did use some spray starch.  I found this helped with the cutting of the diamonds as well as in the sewing of the diamonds. When it came to ironing the rows of joined diamonds Jan Krentz recommended to make an ironing template to keep the strips straight when you press them.  All you needed was a plain piece of cotton fabric and then just draw on it parallel lines the width of your rows of diamonds.  Then you just pin it to your ironing board.  This is what my cloth looks like.


Then you lay one of the rows of diamonds so that it is aligned between the lines that you have drawn. As you iron make sure that you keep the row in place.  I found using this cloth kept my row nice and straight and nothing got distorted.  I also used a dry iron since in the past I have found that using steam can distort blocks with bias seams. Here is what one of my rows looks like on the pressing template.


The next challenge is joining the rows and getting the intersections to align. Jan had several methods outlined in her book.  I tried a few, some sort of worked, but not consistently enough for me.  I think it is something that does take practice. I did though find one method that seemed to work for me. It was the one where you actually take each row separately and without any thread in the sewing machine, go and stitch just at the seam area a 1/4" line to mark your fabric.  Here is a picture of a row at the machine being stitched.


This is what it will look like after you take it out.  Please note that the holes the needle leaves works well in tight weave fabrics like batiks, but if you have loose weaves then this method might not work so well.


Now that you have your fabric marked, take a pin and stick it at the stitched line into the seam of the two fabrics.


Do the same to the second layer of fabric.


Finish pinning the two sections together.


Continue doing this for all the intersecting seams and then sew your 1/4" seam. This is the end result that I got with this method.  I did have a few intersections that I had to rip out and redo, but for the most part I got really good matches.


So this weekend I'm going to be busy with making my Gerber daisy patterns for the 5 flowers and then getting all the pink fabrics prepped and cut. That should keep me busy.

Friday, July 27, 2012

Gerber Daisy Wall Hanging - Part 1

My new project that I'm currently working on is a Gerber daisy wall hanging. The actual design for this wall hanging is my own and I'm making it for my friend Karen who loves Gerber daisies. The Gerber daisies will be fused applique and what I did to come up with my design for the daisies was to first study many photographs of Gerber daisies. I had some of my own that I have taken over the years plus I did several Google searches to find some good specimens for my research.  I decided that my Gerber was going to be multi-layered since the petals of this flower typically have several rows as do the smaller central petals near the centre of the flower.

I did a test run to see how it would look and was pleased with my results. Here is my sample piece which I turned into a mini wall hanging that I now have up in my sewing room. The flower is about 7" across which was a nice size to work with. If it was much smaller then I think the cutting and sewing would become tedious.


For the actual wall hanging I'm planning on having 5 Gerber daisies in various shades of pink from light to dark on a pieced green background. The background is what I have been working on this week since I also wanted to try something different there as well. I have been interested in the diamond blocks that are used in Jan Krentz's book "Diamond Quilts and Beyond". 
http://www.jankrentz.com/store-details.php?ID=9

After going through my stash of green fabrics and realizing that I was a bit shy on the dark greens, I picked some up at a couple of quilt shops while I was visiting Buffalo and Rochester a couple of weeks ago. I got my various green diamonds cut and spent the last few days working on the design wall arranging the background layer. This is what it looks like.


I'm quite pleased with the results since I have managed to get that colour washed effect I was after.  So now comes the fun part of sewing all those rows of diamonds together, yes we are talking biased seams. Now I did use spray starch when I was ironing my fat quarters to help with the stability issue. I tried first to cut one strip as per the instructions in Jan's book and found that without the starch there was too much stretch and I knew I would have problems when it came to sewing all those diamonds. Hopefully with the starch I will have saved myself some headaches. I will let you know next week.

Tuesday, July 24, 2012

Ricky Tims Seminar - Rochester NY

I attended the Ricky Tims Quilt Seminar in Rochester NY from July 12 - 14. This was my second time, the first was almost 2 years ago in Cape Cod. My friend Sue from Long Island who went with me to the one in Cape Cod also came to this one. We were both fairly new quilters at that time, really enjoyed ourselves but also found some of the stuff over our heads. We thought this would be a nice get away, a chance to see each other, doing something quilty and hopefully pick up on stuff that the first time wasn't all that clear.

Let me tell you we had a blast, learned some new things and reinforced some old stuff. Ricky, Alex and Libby were great teachers as well as very entertaining.  This was their biggest turn out ever with 740 in attendance. The only downside to the event was the stadium seating which either caused issues for those with back/hip problems due to the stiff seats and/or issues with knees/legs due to limited leg room.

I have to say if Ricky's seminar comes to a city near you, you may want to consider going just from an inspirational perspective this seminar really packs a bang. You can check out the details here:
http://www.rickytims.com/seminars/seminar-main

Ricky also had some quilts on display that he, Alex and Libby have made as well as some from his private collection. This quilt is one of Ricky's newest ones and is called "Lifelines 3: Can Something Come From Nothing".


Here is a close up of some of the detail work.


This quilt was done by Alex Anderson but unfortunately there wasn't a label on it so I don't have a name. It is hand quilted.


This quilt was done by Libby Lehman and is called "Pinata".


Finally this quilt is from Ricky's private collection and it is called "The Man From Snowy River" and it is by Helen Godden from Australia.  It is a very large quilt and where it was hung I couldn't get back far enough to capture the full quilt. You can get more information on Helen and her work here:
http://www.helengodden.com/index.php?option=com_imagebrowser&folder=Quilts&Itemid=75


This past week I have been busy prepping fabric for a wall hanging art quilt.  I will be putting together some posts on the progress of this project so that you can see what I am currently working on. I need to have this ready for a birthday in mid August.

Tuesday, July 10, 2012

Recovery, New Quilt Oriental Odyssey & Ricky Tims Quilt Seminar

So what have I been up to this past month.  I have spent some time recovering from the thyroid surgery. It was a good thing that it was removed since they did find cancer in both the lump and the thyroid but it was in the very early stages and completely contained. Also nothing had spread to the lymph nodes and that was really good news. 

When I felt up to things I was working on a new quilt called Oriental Odyssey.  This quilt I was making it for my Tao Shiatsu therapist Alex. He is currently working on renovating a building that he purchased at the beginning of this year and the hopes is to open a new healing center by the end of this year.  He was having his first fund raising event this past Friday and it was held at the new place so people could see where the new center will be and what his vision for the place is. I'm very thankful to Alex for his treatments since they have been very beneficial as I have been going through my recovery from the iron deficiency anemia and then this thyroid stuff. Sometimes just plain western medicine isn't enough to get a person back on track.

I made this quilt for his silent auction that he is going to have in September in the hopes that he will be able to raise some money through my contribution since I'm not in a position at this time to make a financial one. The quilt was a big hit at the event and hopefully it has created sufficient interest for the silent auction that will be held in September and Alex will have a good turnout for that event.

Here is the front of the quilt:


Here is the back of the quilt:


So tomorrow I'm actually going away on a mini vacation to Buffalo & Rochester NY. I'm going to do some shopping, visit some quilt shops and then it's on to the Ricky Tims quilt seminar. If you have been a follower of my blog for a few years you will likely say but wait a minute you've already been to the Ricky Tims quilt seminar in Cape Cod a couple of years ago.  Yes that's right, I was. I went with my friend Sue from Long Island and yes she is coming to this one as well.  We had so much fun that we decided to take it a second time. The first time we went to the Ricky Tims quilt seminar we were both quite new quilters and now that we both have a few more years of experience we figured we would get a different take from it.  Also it gives us a chance to see each other and have some fun.  I'll be back on Sunday and will give you a review of what I think the second time around.